
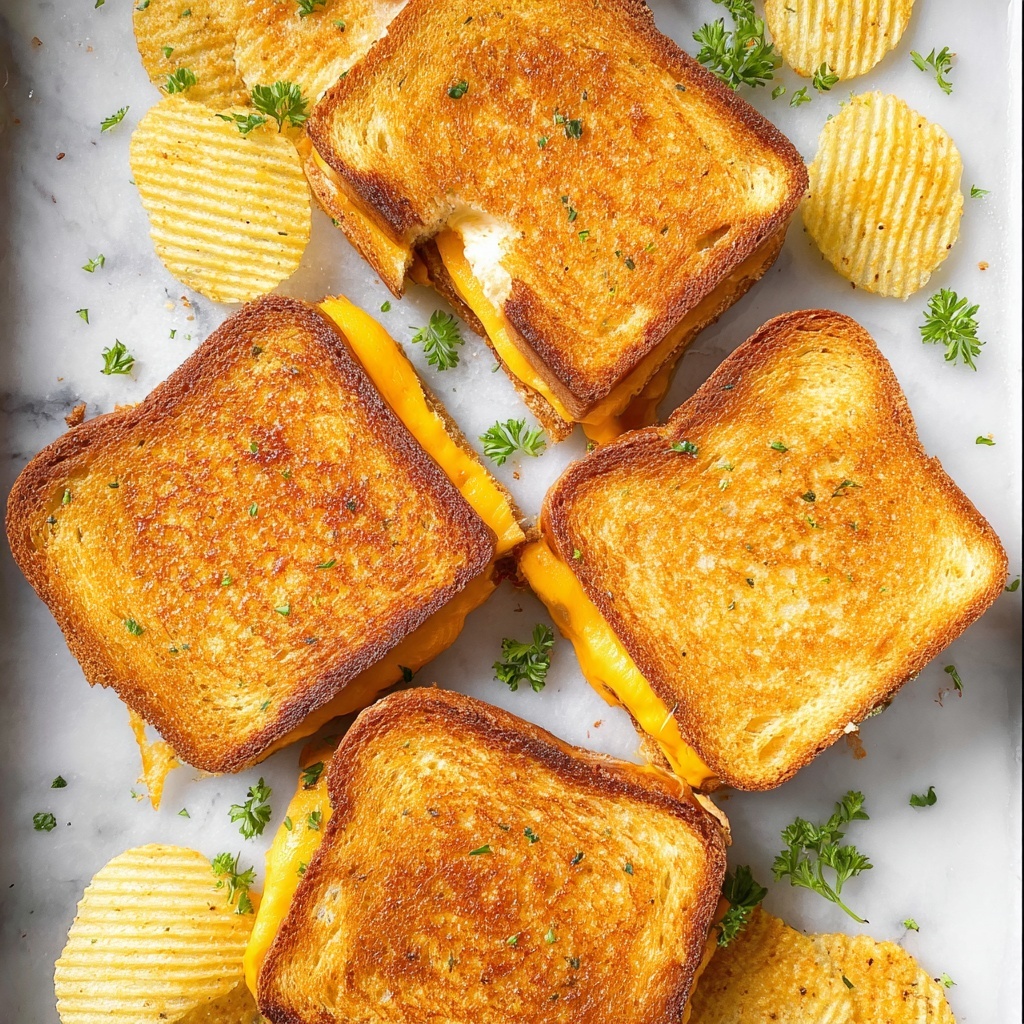
If you have ever thought that making grilled cheese sandwiches had to involve a skillet or a pan, think again! The Oven-Grilled Cheese Sandwiches Recipe is an absolute game-changer. It offers a no-fuss way to create perfectly melty and crispy sandwiches all at once, with an unbeatable golden crust. Whether you’re feeding a crowd or just craving a comforting classic, this method guarantees that every sandwich is consistent and delicious, making it one of my all-time favorite quick meals to whip up at home.
Ingredients You’ll Need
Keeping things simple is part of the magic with this recipe. Each ingredient plays a crucial role — from the bread providing structure and crunch to the cheese delivering that irresistible gooey center. Butter ties it all together with golden crispiness and rich flavor.
- Sunbeam white bread: A classic choice that crisps up beautifully while staying soft inside.
- Butter, melted: Essential for that golden, slightly crunchy exterior and a buttery aroma.
- American cheese slices: Perfect for melting into the dreamiest, creamy center that oozes with every bite.
How to Make Oven-Grilled Cheese Sandwiches Recipe
Step 1: Preheat the Oven
Set your oven to 400ºF to get it hot and ready. Preheating ensures that the sandwiches get that perfect crust and the cheese melts evenly, giving you a sandwich that’s crispy outside and irresistibly melty inside.
Step 2: Butter the Bread
Brush six slices of bread with melted butter on one side. This step is crucial because the butter creates a golden, satisfying crunch once baked. Placing the buttered side down on your baking sheet forms the crisp base for your sandwich.
Step 3: Layer the Cheese
Top each of the buttered bread slices with two slices of American cheese. The double layer ensures every bite is packed with that creamy, melty goodness we all love. Then cover them with the remaining bread slices to complete your sandwich stacks.
Step 4: Butter the Tops
Brush the tops of the sandwiches with the remaining melted butter. This will help the top brown nicely and add extra flavor and crunch. Don’t be shy; this butter is the secret to that golden crust that makes grilled cheese so addictive.
Step 5: Bake to Perfection
Pop your sandwiches into the oven and bake for 12 to 15 minutes. Keep an eye on them as ovens vary, but you want each sandwich to be a beautiful golden brown. This step ensures the cheese melts perfectly while the bread crisps up evenly without flipping.
How to Serve Oven-Grilled Cheese Sandwiches Recipe

Garnishes
Simple is best here — a light sprinkle of freshly cracked black pepper or a few fresh basil leaves add a lovely subtle lift that complements the richness of the cheese. For an extra treat, try a small dollop of tangy tomato chutney or a drizzle of honey mustard on the side.
Side Dishes
Grilled cheese sandwiches are wonderfully versatile and pair beautifully with almost anything. Classic tomato soup is a warm and comforting choice that perfectly balances the richness. For a fresher take, crunchy veggie sticks or a crisp green salad with vinaigrette provide a refreshing contrast.
Creative Ways to Present
For a fun twist, cut the sandwiches into small, fun shapes using cookie cutters for a party platter or kid-friendly snack. Another idea is to serve each sandwich open-faced with a sprinkle of fresh herbs and a dusting of smoked paprika, elevating the presentation while adding a bit of smoky intrigue.
Make Ahead and Storage
Storing Leftovers
If you have any leftover Oven-Grilled Cheese Sandwiches Recipe, store them in an airtight container at room temperature for up to a day. For longer freshness, pop them in the fridge, but just know the crust may soften slightly. They’re still delightful when reheated right.
Freezing
Freezing these sandwiches is definitely possible! Wrap each sandwich tightly in plastic wrap and then aluminum foil or place them in a freezer bag. They can stay delicious for up to a month, making it a perfect make-ahead option for busy days or quick lunches.
Reheating
The best way to bring your sandwiches back to life is by reheating in a toaster oven or regular oven at 350ºF for about 8-10 minutes. This method restores the crispiness of the bread and melts the cheese just right — unlike the microwave, which tends to make them gummy.
FAQs
Can I use different types of bread for this recipe?
Absolutely! While classic white bread grills to golden perfection, whole wheat, sourdough, or even rye can add exciting flavor variations. Just remember that thicker slices may need a few extra minutes in the oven.
Is American cheese necessary, or can I use other cheeses?
American cheese is great for its meltability and creamy texture, but feel free to mix it up with cheddar, mozzarella, or even a blend of cheeses for richer flavor profiles. Just choose cheeses that melt well for the best result.
Can I add extras like tomatoes or bacon?
Definitely! Add thin tomato slices, cooked bacon, or caramelized onions inside before baking for an elevated twist on the classic. Just be mindful not to overfill, so the sandwiches seal and cook evenly.
How do I avoid soggy sandwiches?
Using melted butter on both sides of the bread and baking on a rimmed baking sheet ensures a crisp crust. Also, avoid adding very wet fillings until after baking to maintain that perfect texture contrast.
Can I make this recipe vegan?
Yes! Use vegan butter substitutes and your favorite plant-based cheese slices that melt well. The oven method still works wonders for crisping up the bread and melting the cheese alternatives beautifully.
Final Thoughts
This Oven-Grilled Cheese Sandwiches Recipe is a true delight, combining simplicity with delicious results every single time. It’s fast, fuss-free, and perfect for those moments when you want a comforting meal without the hassle. I encourage you to try it out, experiment with your favorite flavors, and make this little kitchen treasure your own go-to comfort food. Trust me, once you’ve tasted these golden, melty sandwiches straight from the oven, you’ll never look back!
Print
Oven-Grilled Cheese Sandwiches Recipe
- Prep Time: 5 minutes
- Cook Time: 15 minutes
- Total Time: 20 minutes
- Yield: 6 servings
- Category: Sandwich
- Method: Baking
- Cuisine: American
Description
This classic grilled cheese recipe is prepared in the oven for a perfectly crispy, golden-brown sandwich with gooey melted cheese inside. It’s easy to make and yields deliciously warm sandwiches that are ideal for a quick lunch or comforting snack.
Ingredients
Ingredients
- 12 slices Sunbeam white bread
- 4 Tbsp butter, melted
- 12 slices American cheese
Instructions
- Preheat Oven: Preheat your oven to 400ºF to ensure it is hot enough to crisp up the bread and melt the cheese evenly.
- Butter Bread Base: Brush one side of 6 bread slices with melted butter, then place the slices butter side down on a rimmed baking sheet for a golden, crispy base.
- Add Cheese Layers: Top each buttered bread slice with 2 slices of American cheese, spreading them evenly for good coverage and melt.
- Assemble Sandwich: Place the remaining 6 bread slices on top of the cheese layers, then brush the tops with the remaining melted butter to help brown the sandwich during baking.
- Bake: Bake the assembled sandwiches in the preheated oven for 12 to 15 minutes until the bread is golden brown and the cheese is nicely melted.
Notes
- Use a rimmed baking sheet to catch any melted butter or cheese drippings.
- For extra flavor, add a pinch of garlic powder or dried herbs to the melted butter before brushing.
- Check the sandwiches midway to prevent over browning if your oven runs hot.
- Serve warm immediately for the best cheesy experience.


