
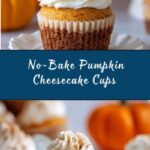
If you are searching for a cozy, delightful dessert that captures the essence of autumn without turning on the oven, this No-Bake Pumpkin Cheesecake Cups Recipe is an absolute game-changer. Each bite delivers a perfect balance of creamy pumpkin-spiced cheesecake atop a buttery graham cracker crust, all wonderfully easy to prepare and wonderfully irresistible. Whether you’re hosting a casual gathering or simply craving a seasonal treat, these pumpkin cheesecake cups are a warm hug in dessert form.
Ingredients You’ll Need
These ingredients are refreshingly simple but come together to create a luscious blend of flavors and textures that make this recipe so special. From the buttery graham cracker crust to the silky, spiced pumpkin cheesecake filling, every element plays a key role.
- 1 cup graham cracker crumbs: Provides a crunchy, buttery base; use gluten-free crumbs if needed.
- 3 tablespoons unsalted butter, melted: Binds the crumbs and adds rich flavor to the crust.
- 1 tablespoon granulated sugar: Sweetens and enhances the crust’s texture.
- 8 ounces cream cheese, softened: The creamy heart of the cheesecake filling, softened for smooth blending.
- 1/2 cup canned pumpkin puree: Adds natural pumpkin flavor and moist texture.
- 1/3 cup granulated sugar: Sweetens the filling perfectly without overpowering the spices.
- 1 teaspoon pure vanilla extract: Deepens the flavor, adding warmth and complexity.
- 1 teaspoon pumpkin pie spice: The signature spice mix that gives the cheesecake its iconic autumn flair.
- 1/2 teaspoon ground cinnamon: Enhances the spiced notes and aroma.
- 1 cup whipped cream or whipped topping: Lightens the filling for a fluffy, airy texture.
- Extra whipped cream: For topping each cup with a luscious finish.
- Crushed graham crackers or a sprinkle of cinnamon: Adds a decorative and flavorful garnish.
How to Make No-Bake Pumpkin Cheesecake Cups Recipe
Step 1: Prepare the Crust
In a bowl, mix the graham cracker crumbs, melted butter, and sugar until combined. This will create a slightly crunchy, buttery crust that forms a perfect foundation for your pumpkin cheesecake cups.
Step 2: Form the Crust Base in Cups
Spoon about 2 tablespoons of the crust mixture into individual serving cups or jars. Press lightly with your fingers or the back of a spoon to compact the crumbs so that they hold their shape as the crust.
Step 3: Make the Pumpkin Cheesecake Filling
In a mixing bowl, beat the softened cream cheese until smooth and creamy, eliminating any lumps. This creates a silky base for the pumpkin filling to meld with.
Step 4: Add Pumpkin and Spices
To the cream cheese, add pumpkin puree, sugar, vanilla extract, pumpkin pie spice, and cinnamon. Beat everything together until you have a smooth, luscious, and aromatic pumpkin cheesecake mixture.
Step 5: Fold in Whipped Cream
Gently fold the whipped cream into the pumpkin mixture. This step lightens the filling, turning it delightfully fluffy and airy—making it feel indulgent without being heavy.
Step 6: Assemble the Cups
Evenly spoon the pumpkin cheesecake filling over the prepared graham cracker crusts in each cup. Smooth the tops carefully with the back of a spoon or spatula for a clean, polished look.
Step 7: Add the Toppings
Top each cup with a generous dollop of whipped cream. Then, sprinkle crushed graham crackers or a touch of cinnamon on top to add a lovely texture contrast and extra flavor pop.
Step 8: Chill and Serve
Refrigerate your beautifully assembled No-Bake Pumpkin Cheesecake Cups Recipe for at least 2 hours. This chilling time allows the cheesecake to set perfectly, making every spoonful smooth and satisfying when you dig in.
How to Serve No-Bake Pumpkin Cheesecake Cups Recipe
Garnishes
To really elevate the look and flavor of your pumpkin cheesecake cups, opt for a swirl of extra whipped cream and a sprinkle of finely crushed graham crackers. A dusting of cinnamon or nutmeg can also add an inviting aroma and a finish that’s both elegant and homey.
Side Dishes
This dessert is wonderfully rich on its own, but if you want to create a balanced dessert spread, consider serving alongside fresh apple slices, cinnamon-spiced nuts, or a cup of warm chai tea. These pairs complement the pumpkin-spiced flavors and create a cozy autumn vibe.
Creative Ways to Present
Try layering the crust and filling in clear mini mason jars or pretty glass cups to show off the beautiful layers. For a festive touch, add a cinnamon stick or a small edible flower on top. You can also serve them on a dessert platter with assorted autumn-themed toppings, letting guests customize their own creations.
Make Ahead and Storage
Storing Leftovers
Once prepared, keep your no-bake pumpkin cheesecake cups covered in the refrigerator. They will stay fresh and creamy for up to 3 days, making them perfect for prepping in advance or enjoying over several days.
Freezing
If you’d like to freeze these delightful cups, do so without the whipped cream topping, as it can lose its texture. Freeze the cheesecake cups in an airtight container for up to 1 month. Thaw overnight in the fridge before serving.
Reheating
This dessert is best served chilled and does not require reheating. If it has been frozen, just allow it to thaw completely in the refrigerator to maintain its creamy texture and full flavor.
FAQs
Can I use fresh pumpkin instead of canned pumpkin puree?
Yes, you can use fresh pumpkin, but you will need to cook and puree it beforehand. Make sure the pumpkin is cooked until soft and pureed to a smooth consistency to maintain the right texture for the cheesecake filling.
Is it possible to make this recipe dairy-free?
Absolutely! Substitute the cream cheese and butter with their dairy-free alternatives, like vegan cream cheese and plant-based butter. Also, use whipped coconut cream instead of traditional whipped cream for a delicious dairy-free version.
How long does it take for the cheesecake cups to set properly?
Chilling the pumpkin cheesecake cups for at least 2 hours is crucial to allow everything to firm up and develop the best texture. If you have more time, letting them chill overnight will make them even creamier and easier to serve.
Can I make these pumpkin cheesecake cups ahead of time for a party?
Definitely! These no-bake cheesecake cups are excellent make-ahead desserts. Prepare them a day or two before your event, store them in the refrigerator, and add the whipped cream topping just before serving for the freshest look and taste.
What if I don’t have pumpkin pie spice? What can I use instead?
If you don’t have pumpkin pie spice on hand, you can create your own by combining cinnamon, ginger, nutmeg, and cloves. Usually, a mix of 1/2 teaspoon cinnamon, 1/4 teaspoon ginger, and a pinch of nutmeg and cloves works perfectly as a substitute.
Final Thoughts
This No-Bake Pumpkin Cheesecake Cups Recipe takes seasonal flavors to the next level with minimal effort and maximum joy. It’s the perfect dessert to enjoy now and all fall long, whether as a comforting treat for yourself or a show-stopping delight for guests. I really encourage you to try making this recipe—it’s so satisfying to see how a few simple ingredients turn into such a luscious, festive dessert. Happy pumpkin season and happy eating!
Print
No-Bake Pumpkin Cheesecake Cups Recipe
- Prep Time: 15 minutes
- Cook Time: 0 minutes
- Total Time: 2 hours 15 minutes
- Yield: 6 servings
- Category: Dessert
- Method: No-Cook
- Cuisine: American
- Diet: Vegetarian
Description
These No-Bake Pumpkin Cheesecake Cups are a creamy and delicious autumn-inspired dessert that’s quick to prepare and perfect for any occasion. Featuring a buttery graham cracker crust with a spiced pumpkin cheesecake filling, topped with whipped cream and a sprinkle of cinnamon or graham crackers, these individual cups offer a delightful seasonal treat without the need for baking.
Ingredients
Crust
- 1 cup graham cracker crumbs (gluten-free if needed)
- 3 tablespoons unsalted butter, melted
- 1 tablespoon granulated sugar
Cheesecake Filling
- 8 ounces cream cheese, softened
- 1/2 cup canned pumpkin puree
- 1/3 cup granulated sugar
- 1 teaspoon pure vanilla extract
- 1 teaspoon pumpkin pie spice
- 1/2 teaspoon ground cinnamon
- 1 cup whipped cream or whipped topping
Toppings
- Extra whipped cream
- Crushed graham crackers or a sprinkle of cinnamon
Instructions
- Prepare the Crust: In a bowl, mix the graham cracker crumbs, melted butter, and sugar until combined thoroughly to create a crumbly mixture that holds together when pressed.
- Form the Crust in Cups: Spoon about 2 tablespoons of the crumb mixture into individual serving cups or jars. Press lightly with your fingers or the back of a spoon to form an even, compact crust layer at the bottom of each cup.
- Make the Pumpkin Cheesecake Filling: In a separate mixing bowl, beat the softened cream cheese until smooth and creamy to remove any lumps completely.
- Add Pumpkin and Spices: Add the pumpkin puree, granulated sugar, vanilla extract, pumpkin pie spice, and ground cinnamon to the cream cheese. Beat the mixture again until it becomes smooth, creamy, and well combined.
- Incorporate Whipped Cream: Gently fold the whipped cream or whipped topping into the pumpkin mixture. Use a spatula to fold carefully until the filling is light, fluffy, and homogenous, maintaining the airy texture.
- Assemble the Cups: Spoon the whipped pumpkin cheesecake filling evenly over the prepared crust layer in each cup. Smooth the tops with the back of a spoon or spatula for a neat presentation.
- Add the Toppings: Top each cheesecake cup with a dollop of extra whipped cream. Sprinkle a little crushed graham crackers or a light dusting of cinnamon on top for added texture and flavor.
- Chill and Serve: Refrigerate the assembled cups for at least 2 hours to allow the cheesecake filling to set properly. Serve chilled for the best texture and taste experience.
Notes
- Use gluten-free graham crackers if catering to gluten-sensitive diets.
- Ensure cream cheese is softened to room temperature for easier mixing and a smoother filling.
- For a lighter option, use reduced-fat cream cheese and whipped topping.
- These cups can be stored covered in the refrigerator for up to 3 days.
- To enhance the pumpkin flavor, add a pinch of nutmeg along with the pumpkin pie spice.

