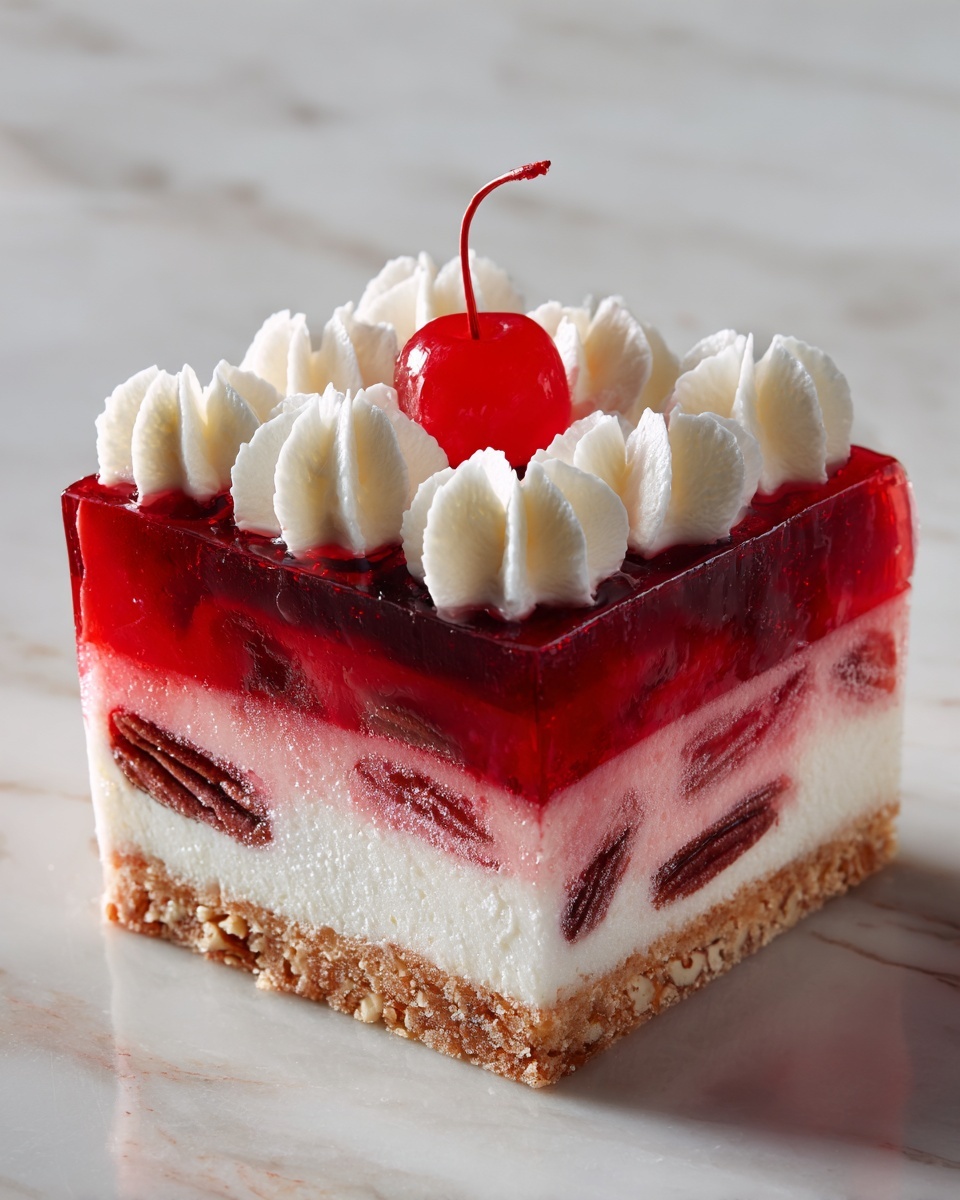
If you’re craving a dessert that combines creamy, dreamy cheesecake with the bright, juicy burst of cherries and all without turning on the oven, this No-Bake Cherry Cheesecake Bars Recipe is exactly what you need. It’s incredibly simple to make, yet so rich in flavor and texture that it feels like an indulgence. Perfect for hot summer days or any time you want a fuss-free treat that tastes like it took hours to make, these bars deliver that classic cheesecake love in every bite, all topped with luscious cherry pie filling for that extra pop of sweetness and color.
Ingredients You’ll Need
This no-bake delight calls for a handful of super accessible ingredients that come together to create magic. Each one plays a key role in giving the bars their perfect balance of crunch, creaminess, and fruity flair.
- Graham cracker crumbs (2 cups): The crunchy base that adds a buttery, slightly sweet foundation to hold everything together.
- Unsalted butter, melted (1/2 cup): Helps bind the crust ingredients and adds richness without overpowering.
- Granulated sugar (2 tablespoons): Sweetens the crust just enough for contrast with the creamy filling.
- Cream cheese, softened (16 oz): The star of the show, offering that silky, tangy richness cheesecake lovers crave.
- Powdered sugar (1 cup): Smoothly sweetens the cheesecake filling without grit.
- Vanilla extract (1 teaspoon): Brings warmth and depth to the cheesecake flavor.
- Heavy whipping cream (1 1/2 cups): Whipped to stiff peaks, it lightens and aerates the filling for a luscious texture.
- Cherry pie filling (1 can, 21 oz): Adds a glossy, fruity finish that perfectly complements the creamy base.
How to Make No-Bake Cherry Cheesecake Bars Recipe
Step 1: Prepare the Crust
Start by mixing the graham cracker crumbs, melted butter, and granulated sugar in a medium bowl until everything is nicely combined and crumbly. Press this mixture firmly and evenly into the bottom of a 9×9-inch baking pan that’s been lined with parchment paper. This creates a sturdy base that will hold up beautifully under the creamy filling. Then, pop the crust into the refrigerator to chill while you move on to the filling.
Step 2: Make the Cheesecake Filling
In a large mixing bowl, beat the softened cream cheese until it’s smooth, creamy, and totally lump-free—that’s key for silky bars. Next, add the powdered sugar and vanilla extract, continuing to beat the mixture until everything is perfectly blended and extra fluffy. This step guarantees that classic cheesecake flavor with a hint of sweetness and a touch of warmth from the vanilla.
Step 3: Whip the Cream and Fold
In a separate clean bowl, whip the heavy whipping cream until it forms stiff peaks. This means that when you lift the whisk, the cream holds its shape firmly without wobbling. Gently fold the whipped cream into the cream cheese mixture using a spatula, taking care not to deflate the airy texture you’ve created. This lightens the filling, making these bars feel indulgent but not heavy.
Step 4: Assemble and Chill
Spread the creamy filling evenly over the chilled graham cracker crust. Then, spoon the cherry pie filling over the top and carefully spread it to cover the entire surface. This shiny cherry topping adds just the right amount of tangy sweetness and vibrant color. Finally, refrigerate the dessert for at least 4 hours so it can set completely—you don’t want to rush this part because that chill time is what transforms these bars into the perfect sliceable treat.
How to Serve No-Bake Cherry Cheesecake Bars Recipe
Garnishes
Dress up these bars with a few fresh cherries, a light dusting of powdered sugar, or a sprig of mint for a pop of green that pleases the eye as much as the palate. For extra decadence, a drizzle of melted white chocolate or a sprinkle of toasted almonds can take the presentation to the next level without stealing the show from that gorgeous cherry topping.
Side Dishes
While these bars shine wonderfully on their own, pairing them with a scoop of vanilla bean ice cream or a dollop of freshly whipped cream adds a cooling contrast that elevates every bite. For a more beverage-focused pairing, a cup of strong coffee or a refreshing glass of sparkling water with lemon balances the dessert’s sweetness beautifully.
Creative Ways to Present
For a party or picnic, slice the bars into squares and serve them on a rustic wooden board alongside fresh fruit and nuts. You can also turn them into mini parfaits by crumbling the bars and layering them with cherry topping and whipped cream in pretty glasses—this adds a fun twist to the classic bars without losing their charm.
Make Ahead and Storage
Storing Leftovers
These No-Bake Cherry Cheesecake Bars keep well in the fridge for up to 4 days when stored in an airtight container. Keeping them chilled ensures that their texture stays just right—not too soft, not too firm—so you can enjoy that perfect creamy bite every time.
Freezing
If you want to make a batch ahead of time, these bars freeze wonderfully. Wrap them tightly with plastic wrap and foil to protect against freezer burn, and freeze for up to 2 months. Thaw in the refrigerator overnight before serving, allowing the flavors to mellow and the texture to soften slightly.
Reheating
No reheating needed here! In fact, these bars are best served chilled or at cool room temperature. Trying to warm them up would melt the perfect texture you waited so patiently to set, so just enjoy them straight from the fridge.
FAQs
Can I use a different fruit topping for this No-Bake Cherry Cheesecake Bars Recipe?
Absolutely! Blueberry, strawberry, or even mixed berry pie fillings work wonderfully and give you an easy way to customize the dessert to your taste or the season.
Do I have to use heavy whipping cream?
Yes, heavy whipping cream is key because it whips up into stiff peaks and creates that light, airy texture in the filling. Using a lighter cream or milk won’t provide the same fluffy consistency.
What can I substitute for graham cracker crumbs?
If you can’t find graham cracker crumbs, digestive biscuits or crushed vanilla wafers are excellent alternatives that still provide a tasty, crisp base.
How long do these bars need to chill?
Plan for at least 4 hours in the refrigerator to allow the filling to set properly and the flavors to meld. If you can wait overnight, that’s even better for a firm, sliceable cheesecake bar.
Can I make this recipe vegan or dairy-free?
This classic version relies heavily on cream cheese and heavy cream, so to make it vegan or dairy-free, you’d need specialized substitutes like vegan cream cheese and coconut cream, but the texture and flavor will differ notably from the original recipe.
Final Thoughts
This No-Bake Cherry Cheesecake Bars Recipe is such a joy to make and share. It’s quick, fuss-free, and pairs that rich cheesecake flavor with fresh cherry sweetness perfectly. Whether you’re treating yourself after a long day or impressing guests at a gathering, these bars are destined to become a favorite. I can’t wait for you to try them and fall in love with this delightful, no-oven-needed dessert experience!
Print
No-Bake Cherry Cheesecake Bars Recipe
- Prep Time: 20 minutes
- Cook Time: 0 minutes
- Total Time: 4 hours 20 minutes
- Yield: 9 bars
- Category: Dessert
- Method: No-Cook
- Cuisine: American
- Diet: Vegetarian
Description
These No-Bake Cherry Cheesecake Bars are a delicious and easy-to-make dessert featuring a buttery graham cracker crust topped with a creamy, fluffy cheesecake filling and a sweet cherry pie topping. Perfect for summer or any occasion when you want a rich, indulgent treat without turning on the oven.
Ingredients
Crust
- 2 cups graham cracker crumbs
- 1/2 cup unsalted butter, melted
- 2 tablespoons granulated sugar
Filling
- 16 oz cream cheese, softened
- 1 cup powdered sugar
- 1 teaspoon vanilla extract
- 1 1/2 cups heavy whipping cream
Topping
- 1 can (21 oz) cherry pie filling
Instructions
- Prepare the crust: In a medium bowl, combine the graham cracker crumbs, melted butter, and granulated sugar. Mix until the ingredients are well incorporated. Press the crust mixture firmly into the bottom of a 9×9-inch baking pan lined with parchment paper. Chill the crust in the refrigerator while preparing the filling to help it set.
- Make the filling: In a large mixing bowl, beat the softened cream cheese until smooth and creamy using an electric mixer. Add the powdered sugar and vanilla extract, and continue beating until completely combined and fluffy.
- Whip the cream: In a separate clean bowl, whip the heavy whipping cream until stiff peaks form. This means when you lift the whisk, the peaks stand straight without collapsing.
- Combine filling and whipped cream: Gently fold the whipped cream into the cream cheese mixture using a spatula. Fold carefully to maintain the airiness of the whipped cream and ensure a light, fluffy texture throughout.
- Assemble the bars: Spread the cheesecake filling evenly over the chilled graham cracker crust. Then, spoon the cherry pie filling over the top and gently spread it to ensure an even layer without mixing the layers.
- Chill: Refrigerate the assembled bars for at least 4 hours or until fully set and firm enough to slice neatly.
- Serve: Once set, slice the cheesecake into 9 bars. Serve chilled for the best texture and flavor.
Notes
- For a firmer crust, freeze it for 15 minutes before adding the filling to help it set better.
- You can substitute the cherry topping with blueberry or strawberry pie filling for variety.
- For a lighter version, replace regular cream cheese with reduced-fat cream cheese and use whipped topping instead of heavy whipping cream.

