
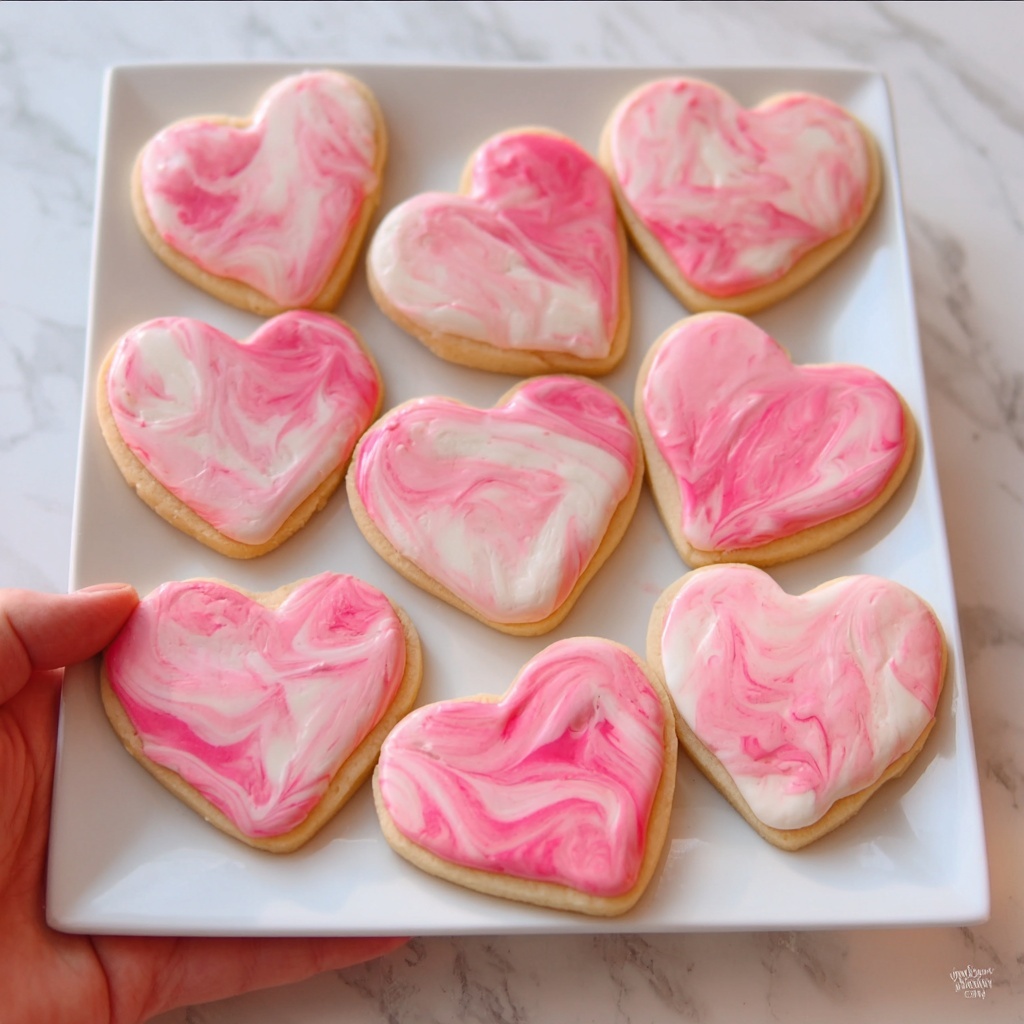
The Marbled Heart Sugar Cookie Cutouts Recipe is a delightful treat that effortlessly combines the classic buttery sweetness of sugar cookies with a stunning marbled pink and red swirl that catches the eye and wins hearts. These cookies are not only charming to look at but also soft and tender with a melt-in-your-mouth texture, making them perfect for special occasions like Valentine’s Day, anniversaries, or simply as a joyful baking project with loved ones. The magic of this recipe lies in its simplicity and the beautiful marbling technique that turns ordinary sugar cookies into edible works of art.
Ingredients You’ll Need
This Marbled Heart Sugar Cookie Cutouts Recipe relies on simple, everyday ingredients that come together to create rich flavor, tender texture, and vibrant color. Each component plays a crucial role in making perfectly balanced cookies:
- 2 3/4 cups all-purpose flour: Provides structure and the classic soft chewiness of sugar cookies.
- 1 teaspoon baking powder: A gentle leavening agent that ensures a light, airy texture.
- 1/2 teaspoon salt: Enhances all the sweet and buttery flavors harmoniously.
- 1 cup unsalted butter, softened: The heart of richness and tenderness in these cookies.
- 3/4 cup granulated sugar: Adds the perfect level of sweetness and helps with the cookie’s light crisp edge.
- 1 large egg: Binds ingredients together and contributes moisture for a smooth dough.
- 1 teaspoon vanilla extract: Infuses a warm, fragrant depth that elevates the flavor.
- Red or pink gel food coloring: Brings the signature marbled colors to life without altering texture.
How to Make Marbled Heart Sugar Cookie Cutouts Recipe
Step 1: Prepare the Dry Ingredients
Start by whisking together the flour, baking powder, and salt in a medium bowl. This evenly distributes the leavening and seasoning, setting the foundation for a well-textured cookie. It’s crucial to get this mix right so the cookies can rise just enough without becoming cakey.
Step 2: Cream Butter and Sugar
In a large bowl, cream the softened butter and granulated sugar until light and fluffy, about 2 to 3 minutes. This step is where air is incorporated, which helps the cookies become tender and gives them that slight rise. The creaming also dissolves the sugar, smoothing the batter for the perfect bite.
Step 3: Add Egg and Vanilla
Beat in the egg and vanilla extract until just combined. This adds moisture and flavor that softens the dough, making it easier to blend with the dry ingredients and ultimately ensuring your cookies stay tender but flavorful.
Step 4: Combine Dry and Wet Ingredients
Gradually add the dry ingredient mixture to the wet ingredients, stirring until the dough comes together smoothly. Be careful not to overmix at this stage to maintain that tender crumb that makes sugar cookies so irresistible.
Step 5: Color and Marble the Dough
Divide the dough into two equal parts. Leave one half plain and tint the other with a few drops of red or pink gel food coloring, kneading gently until the color is evenly distributed but not overworked. To create the marbled effect, take small pieces of each colored dough and press them lightly together, twisting gently to swirl the colors without blending them completely.
Step 6: Roll Out and Cut
Roll the marbled dough out on a lightly floured surface to about 1/4-inch thickness. Use a heart-shaped cookie cutter to cut out as many cookies as possible, placing each on a parchment-lined baking sheet. Chilling the cutouts for 10 to 15 minutes in the fridge before baking helps the shapes hold firm and keeps the marbled colors vibrant.
Step 7: Bake to Perfection
Preheat your oven to 350°F (175°C). Bake the cookies for 8 to 10 minutes, or until the edges are just set and beginning to turn a soft golden hue. Allow the cookies to cool on the baking sheet for 5 minutes before transferring them to a wire rack to cool completely. This gentle cooling keeps them tender and avoids cracks.
How to Serve Marbled Heart Sugar Cookie Cutouts Recipe

Garnishes
These charming cookies look gorgeous on their own thanks to the marbled hearts, but you can jazz them up by adding a light dusting of powdered sugar or sprinkling edible glitter on top. For extra decadence, try piping a border of royal icing or drizzling white chocolate to highlight the marbling even more.
Side Dishes
Serve these cookies alongside a cup of hot cocoa, a frothy latte, or a glass of cold milk for the ultimate cozy indulgence. They also make a sweet pairing with fresh berries or whipped cream if you want to elevate them into an elegant dessert plate.
Creative Ways to Present
Package the Marbled Heart Sugar Cookie Cutouts Recipe beautifully for gifts by stacking them with parchment paper in decorative tins or cellophane bags tied with a ribbon. Present them on a festive platter with rose petals or heart confetti to make any celebration feel extra special.
Make Ahead and Storage
Storing Leftovers
To keep your cookies fresh and soft, store leftovers in an airtight container at room temperature for up to one week. Adding a slice of bread to the container can help maintain moisture, keeping the cookies wonderfully tender.
Freezing
You can freeze the dough before shaping or the finished cookies themselves. Wrap the dough tightly in plastic wrap and freeze for up to three months, thawing overnight in the fridge before rolling and cutting. Baked cookies freeze well too; store them in an airtight container with parchment layers to prevent sticking.
Reheating
If you want to refresh the cookies’ soft texture, reheat them in a low oven (about 300°F / 150°C) for 5 minutes or microwave them briefly for 10-15 seconds to warm through without drying out. They’ll taste almost as fresh as right out of the oven.
FAQs
Can I use food coloring other than red or pink?
Absolutely! Feel free to experiment with other gel colors like purple or orange to create different marbled effects that suit your theme or mood. Just be mindful that brighter colors show the marbling best.
How do I prevent the colors from blending too much?
The key is gentle handling: press and twist the colored and plain dough together lightly but avoid kneading them into a uniform shade. Overworking the dough will lose the beautiful marbled look.
Can I make these cookies without chilling the dough?
Chilling the cutouts helps keep the cookies’ shape intact while baking and enhances the marbled appearance. Skipping this step might cause spreading and blending of the colors, so chilling is highly recommended for best results.
Are these cookies suitable for vegetarians?
Yes, this Marbled Heart Sugar Cookie Cutouts Recipe is vegetarian-friendly as it does not include any meat products or gelatin. It’s perfect for most diets that allow dairy and eggs.
Can I decorate these cookies with icing after baking?
Definitely! Once cooled, these cookies provide a wonderful canvas for royal icing, buttercream, or even edible glitter. Adding decorations can make them even more festive and personalized for holidays or parties.
Final Thoughts
If you’re looking to bake something that’s both visually stunning and irresistibly delicious, the Marbled Heart Sugar Cookie Cutouts Recipe is your new best friend. Its warm, buttery tenderness combined with those striking swirls of pink and red will brighten any gathering or cozy afternoon treat. I can’t wait for you to give this recipe a try — it’s a sweet little labor of love that’s bound to bring smiles and maybe even a few hugs!
Print
Marbled Heart Sugar Cookie Cutouts Recipe
- Prep Time: 30 minutes
- Cook Time: 10 minutes
- Total Time: 40 minutes (plus chilling time)
- Yield: 24 cookies
- Category: Dessert
- Method: Baking
- Cuisine: American
- Diet: Vegetarian
Description
These Marbled Heart Sugar Cookie Cutouts are perfect for Valentine’s Day or any special occasion. Featuring a delightful marbled effect with red or pink hues, these tender sugar cookies are soft, buttery, and visually stunning. Easy to make with simple ingredients, they combine classic vanilla flavor with a fun and festive twist.
Ingredients
Dry Ingredients
- 2 3/4 cups all-purpose flour
- 1 teaspoon baking powder
- 1/2 teaspoon salt
Wet Ingredients
- 1 cup unsalted butter, softened
- 3/4 cup granulated sugar
- 1 large egg
- 1 teaspoon vanilla extract
Decoration
- Red or pink gel food coloring
Instructions
- Mix Dry Ingredients: In a medium bowl, whisk together the all-purpose flour, baking powder, and salt to ensure they are evenly combined and aerated.
- Cream Butter and Sugar: In a large bowl, use a mixer to cream the softened unsalted butter and granulated sugar until the mixture is light and fluffy, approximately 2 to 3 minutes, creating a smooth base for the dough.
- Incorporate Egg and Vanilla: Beat in the egg and vanilla extract into the creamed butter and sugar until fully combined, adding moisture and flavor to the dough.
- Add Dry Ingredients: Gradually mix the dry ingredient mixture into the wet ingredients until a smooth dough forms, carefully combining to avoid overworking.
- Divide and Color Dough: Divide the dough into two equal portions. Leave one portion plain and tint the other with a few drops of red or pink gel food coloring, kneading gently until the color is uniformly distributed.
- Create Marbled Dough: Take small pieces from each portion and lightly press them together, twisting gently to achieve a marbled and swirled effect without fully blending the colors.
- Roll Out Dough: On a lightly floured surface, roll the marbled dough to approximately 1/4-inch thickness, preparing it for cutting.
- Cut Hearts: Use a heart-shaped cookie cutter to cut the dough into shapes and place them evenly spaced on a parchment-lined baking sheet.
- Chill Cookies: Refrigerate the cutouts for 10 to 15 minutes to help them maintain shape and prevent spreading during baking.
- Preheat Oven: Set the oven temperature to 350°F (175°C) to prepare for baking.
- Bake Cookies: Bake the chilled cookies for 8 to 10 minutes or until the edges are just set and slightly golden, ensuring they remain tender inside.
- Cool Cookies: Let the cookies cool on the baking sheet for 5 minutes before transferring them to a wire rack to cool completely, preserving their shape and texture.
Notes
- To achieve a more vibrant marbled look, avoid over-mixing the differently colored doughs to maintain distinct swirls.
- Decorate cooled cookies with icing or edible glitter for added flair and festive presentation.
- Ensure butter is softened but not melted for optimal creaming and dough texture.
- Chilling the dough cutouts helps cookies hold their shape during baking.


