
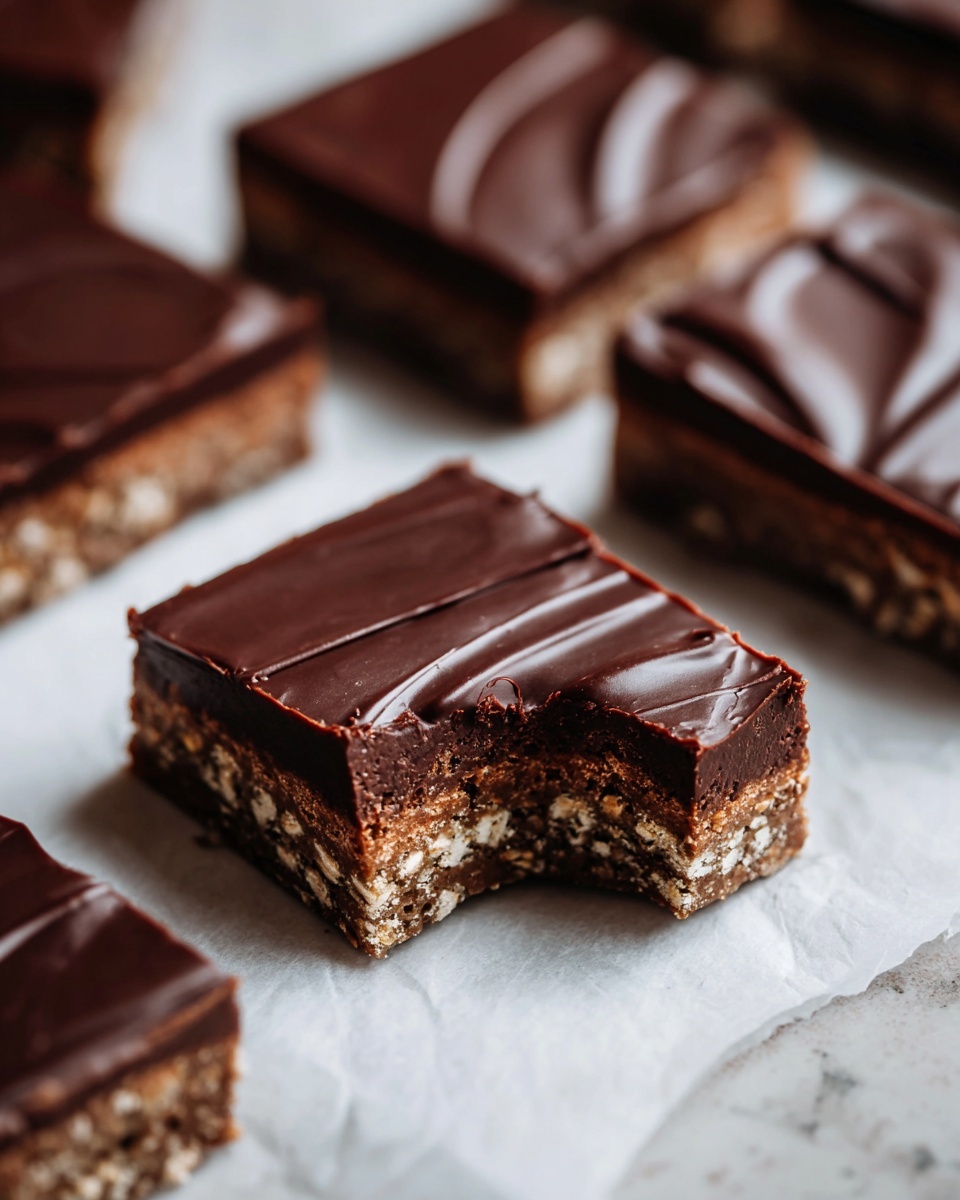
If you have a sweet tooth and love a good nostalgic treat, this Homemade Crunch Bars Recipe is about to become your new best friend in the kitchen. Imagine the perfect harmony of silky melted chocolate, melty marshmallows, and that addictive snap of crisp rice cereal all packed into one scrumptious bar. It’s quick, uncomplicated, and absolutely irresistible, making it an ideal snack or dessert to whip up anytime you crave something comforting yet delightfully crunchy. Trust me, once you try this Homemade Crunch Bars Recipe, you’ll be making it again and again to share with friends and family!
Ingredients You’ll Need
The magic behind these bars lies in their simple ingredients, each bringing something special to the table. Every component is chosen for its role in delivering that perfect balance of flavor and texture—rich chocolate for decadence, buttery smoothness to bind, crispy cereal for crunch, and marshmallows for gooey delight.
- Semi-sweet chocolate chips: These add a rich, slightly tangy chocolate flavor that melts perfectly smooth.
- Unsalted butter: Provides a creamy base and helps the chocolate melt evenly.
- Crisp rice cereal: The star crunch element that keeps these bars satisfying and light.
- Mini marshmallows: Melt into gooey pockets of sweetness and help bind the bars together.
- Vanilla extract: Adds a warm, aromatic note that rounds out the flavors beautifully.
How to Make Homemade Crunch Bars Recipe
Step 1: Melt the Chocolate and Butter
Start by placing the semi-sweet chocolate chips and unsalted butter in a saucepan over low heat. Stir frequently to avoid burning and melt everything to a smooth, luscious consistency. This warm chocolate base is the foundation of your bars, so patience here really pays off.
Step 2: Add Marshmallows and Vanilla
Once your chocolate mixture is silky and smooth, remove it from the heat. Quickly fold in the mini marshmallows and vanilla extract. The marshmallows will soften with the residual heat, creating that perfect sticky, sweet texture without completely melting away.
Step 3: Mix in the Crisp Rice Cereal
Gently fold in your crisp rice cereal, making sure each piece gets fully coated in the chocolate and marshmallow mixture. Take care not to crush the cereal to preserve that crunchy texture that makes these bars so delightful.
Step 4: Press the Mixture Into a Pan
Line an 8×8-inch baking dish with parchment paper, leaving an overhang for easy removal later. Pour the mixture into the dish and press down firmly to compact it evenly. This step ensures your bars will hold together well when sliced.
Step 5: Chill to Set
Pop the dish into the refrigerator for at least 30 minutes. Chilling allows the chocolate and marshmallows to firm up, locking in the shape and making the bars easier to slice and handle.
Step 6: Slice and Enjoy
Lift the set mixture out of the pan using the parchment edges. Cut into 12 equal bars and get ready for an irresistible crunchy, chewy delight in every bite!
How to Serve Homemade Crunch Bars Recipe
Garnishes
For an extra pop of appeal, sprinkle a few sea salt flakes on top right after pressing the mixture into the pan for a subtle salty-sweet twist. You can also drizzle melted white chocolate or sprinkle some toasted coconut flakes for added texture and flavor contrast.
Side Dishes
These bars are delightful on their own, but pairing them with a cold glass of milk or a creamy vanilla ice cream enhances the experience beautifully. For a party, consider serving alongside fresh berries for a refreshing complement.
Creative Ways to Present
Turn these Homemade Crunch Bars Recipe bites into party snacks by cutting them into bite-sized squares and stacking them on a pretty platter. Wrap individual bars in parchment paper tied with twine for charming homemade gifts or lunchbox treats that will brighten up anyone’s day.
Make Ahead and Storage
Storing Leftovers
Store your Homemade Crunch Bars in an airtight container at room temperature for up to 3 days. This keeps them crisp and fresh without needing refrigeration unless your kitchen is particularly warm.
Freezing
To keep the bars longer, wrap each one tightly in plastic wrap and place them in a freezer-safe container or bag. They freeze beautifully for up to 2 months. Just thaw at room temperature before enjoying.
Reheating
These bars are best enjoyed cold or at room temperature, but if you prefer them warm and gooier, pop a bar in the microwave for 10-15 seconds. Be careful not to overheat, or the chocolate may become too soft.
FAQs
Can I use dark chocolate instead of semi-sweet?
Absolutely! Dark chocolate will give your bars a richer, more intense flavor. Just be mindful that it might make the bars a bit less sweet, so adjust your taste preferences accordingly.
What if I don’t have crisp rice cereal? Can I use something else?
Crisp rice cereal is essential for that signature crunch. However, you can experiment with puffed quinoa or even crushed cornflakes for a different texture and flavor—just remember the texture will change.
Can this recipe be made vegan?
Yes! Use vegan chocolate chips, a plant-based butter substitute, and make sure your marshmallows are vegan-friendly. The rest of the ingredients are naturally vegan, making this an easy swap for a plant-based treat.
Is it necessary to chill the bars in the fridge?
Chilling is crucial for these bars to set properly because it allows the chocolate and marshmallows to firm up and hold the cereal together. Skipping this can result in a messier bar that falls apart.
Can I add nuts or other mix-ins to this recipe?
Definitely! Chopped almonds, walnuts, or even dried cranberries can add delicious flavor and texture. Just fold them into the mixture before pressing it into the pan.
Final Thoughts
If you’re searching for a sweet treat that’s quick, easy, and so satisfying you’ll find yourself craving it again and again, this Homemade Crunch Bars Recipe is a total winner. It combines simple ingredients in a way that feels special, homemade, and perfectly indulgent. You really can’t go wrong with giving these bars a try—whether for a cozy night in, a potluck, or to share pure joy with someone you love.
Print
Homemade Crunch Bars Recipe
- Prep Time: 10 minutes
- Cook Time: 5 minutes
- Total Time: 15 minutes plus 30 minutes chilling
- Yield: 12 bars
- Category: Dessert
- Method: No-Cook
- Cuisine: American
- Diet: Vegetarian
Description
Homemade Crunch Bars are a delightful no-bake treat featuring a luscious blend of melted chocolate, butter, marshmallows, and crispy rice cereal. These bars are easy to prepare in just 15 minutes, chilled to set, and then sliced into deliciously crunchy squares perfect for snacking or dessert.
Ingredients
Chocolate Mixture
- 1 cup semi-sweet chocolate chips
- 1/4 cup unsalted butter
- 2 cups mini marshmallows
- 1 tsp vanilla extract
Cereal
- 3 cups crisp rice cereal
Instructions
- Melt Chocolate and Butter: In a saucepan over low heat, melt the chocolate chips together with the unsalted butter, stirring frequently until the mixture is smooth and well combined.
- Add Marshmallows and Vanilla: Remove the saucepan from heat, then fold in the mini marshmallows and vanilla extract, stirring gently until fully incorporated and the marshmallows start to melt slightly.
- Combine with Cereal: Carefully add the crisp rice cereal to the chocolate mixture, folding it in gently to ensure the cereal is fully coated, taking care not to crush the crispy texture.
- Prepare Baking Dish: Line an 8×8-inch baking dish with parchment paper, ensuring some overhang to assist with removal later. Pour the cereal mixture into the dish and press down firmly with a spatula or your hands to pack it evenly.
- Chill to Set: Place the dish in the refrigerator and chill for at least 30 minutes, allowing the chocolate and marshmallow mixture to firm up completely.
- Slice and Serve: Once set, lift the mixture out using the parchment paper edges, slice into 12 bars, and enjoy your homemade crunchy treats!
Notes
- For a nutty variation, consider adding chopped nuts to the mixture before chilling.
- Ensure to press the mixture firmly into the pan to help the bars hold together well.
- Store leftover bars in an airtight container in the refrigerator for up to one week.
- Use gluten-free rice cereal if you need to make this recipe gluten-free.


