
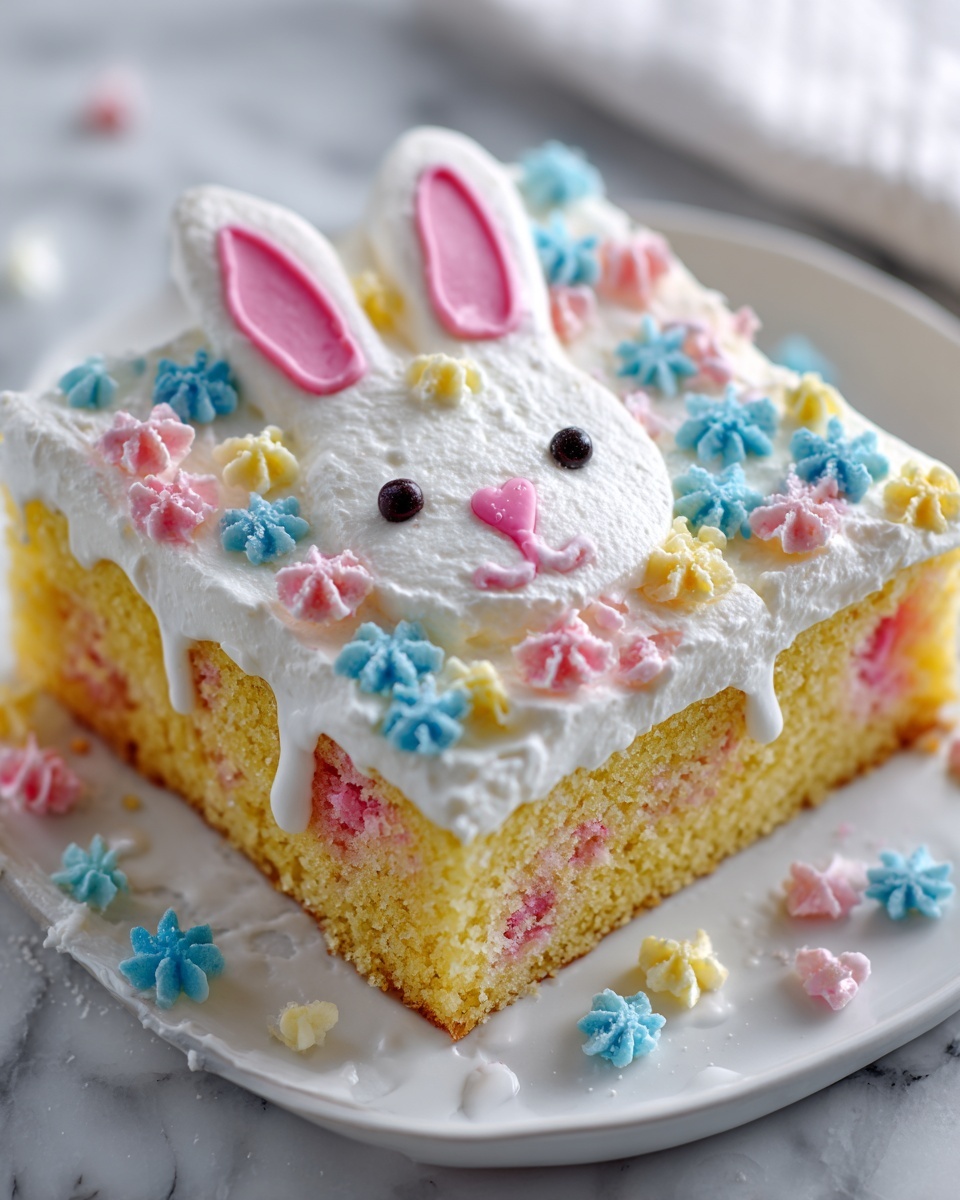
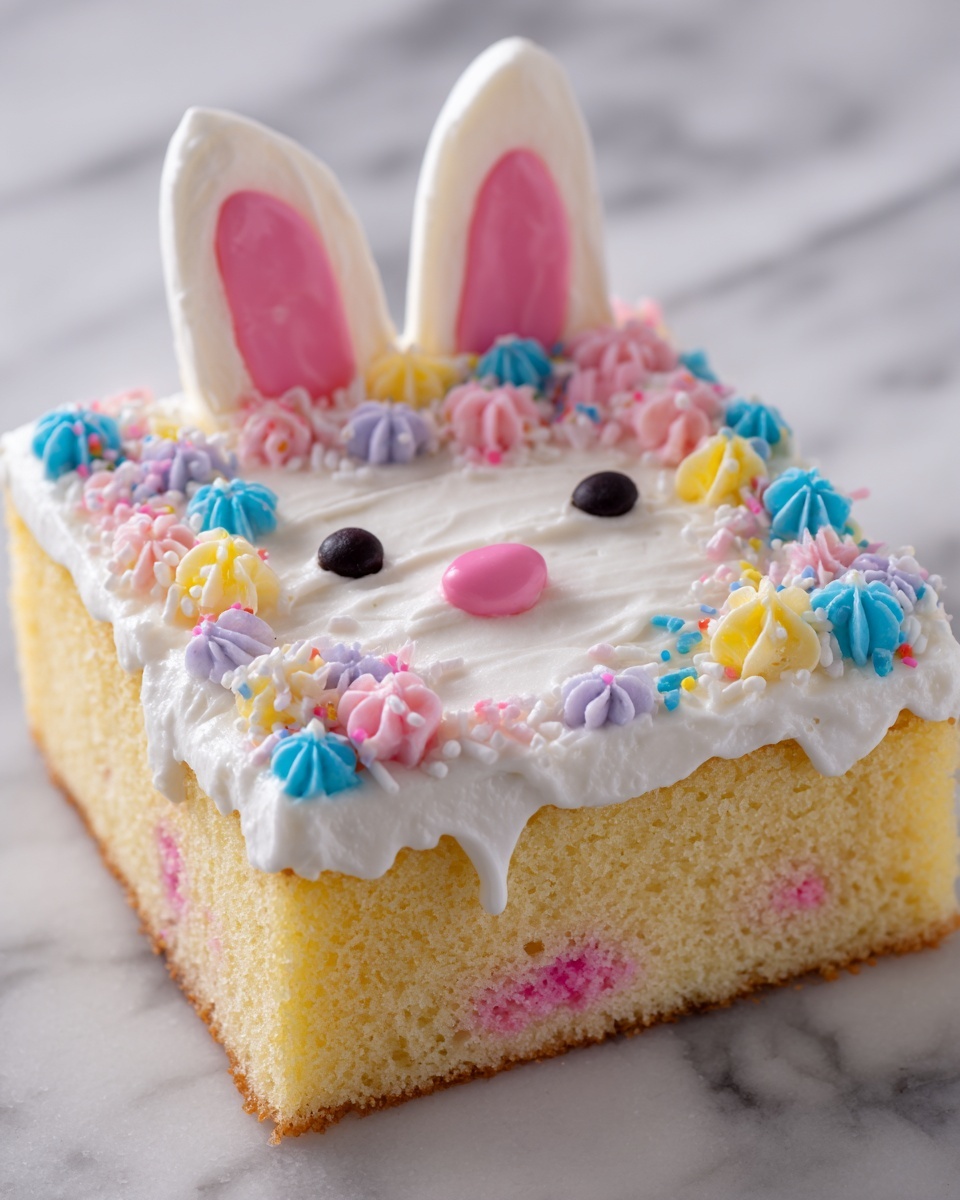
If you are looking for a festive, fun, and utterly delightful dessert to brighten up your spring celebrations, you have to try this Easter Bunny Poke Cake Recipe. It’s a charming and playful cake that combines a moist, fluffy base with a luscious pudding filling and whimsical Easter decorations. The colorful jelly beans and coconut bunny ears not only make it a feast for the eyes, but every bite bursts with creamy, sweet clouds of flavor that adults and kids alike can enjoy. Whether you’re hosting an Easter gathering or simply want to add a bit of seasonal joy to your dessert table, this Easter Bunny Poke Cake Recipe is sure to bring smiles and compliments all around.
Ingredients You’ll Need
The magic of this Easter Bunny Poke Cake Recipe starts with simple, easy-to-find ingredients that each play a vital role: the cake mix provides a dependable, soft structure; the pudding mix brings that unbeatable creamy filling; and the decorations add that iconic Easter charm. Every ingredient is chosen to ensure a perfect balance of texture, flavor, and festive color.
- 1 box (18.25 oz) white or yellow cake mix: The base of this recipe, for a tender and sweet cake that everyone loves.
- 3 large eggs: Adds moisture and helps the cake rise beautifully.
- 1 cup water: Keeps the batter smooth and the cake moist.
- 1/2 cup vegetable oil: Ensures a tender crumb and rich texture.
- 1 package (3.4 oz) instant vanilla pudding mix: Creates the rich, creamy layer inside the poke holes.
- 2 cups cold milk: Necessary for whipped pudding that sets perfectly.
- 1 container (8 oz) whipped topping (such as Cool Whip), thawed: Adds light, fluffy sweetness to top off the cake.
- Pastel-colored jelly beans or candy-coated chocolates (e.g., M&M’s): Provides colorful, festive decoration with a fun crunch.
- 1 cup shredded coconut (dyed pink or left white for bunny ears): Adds texture and a whimsical touch for the bunny ears.
- Optional: Candy eyes, licorice strips, or other decorations for bunny faces: Personalizes the cake and makes it extra adorable.
How to Make Easter Bunny Poke Cake Recipe
Step 1: Prepare and Bake the Cake
Start by preheating your oven to 350 degrees Fahrenheit and greasing a 9×13-inch baking dish. In a large mixing bowl, combine the cake mix, eggs, water, and vegetable oil until you achieve a smooth batter. Pour it into your prepared pan, then bake according to the package instructions—usually around 25 to 30 minutes—until the cake springs back gently when touched. This simple base is what sets the stage for all the magic that follows.
Step 2: Create the Poke Holes
After the cake is baked, let it cool for about 10 minutes so it is still warm but not hot. Then, take the handle of a wooden spoon and gently poke holes all over the surface of the cake. This step is crucial because it allows the pudding mixture to seep inside, infusing every bite with creamy goodness and keeping the cake wonderfully moist.
Step 3: Make the Pudding Filling
While your cake cools, whisk together the instant vanilla pudding mix with 2 cups of cold milk. Stir until the pudding thickens—this usually takes a few minutes. Once thickened, pour the pudding evenly over the cake, making sure it fills all those lovely holes you poked earlier. Pop it in the refrigerator and let it set for at least an hour; this chilling step melds the flavors and textures beautifully.
Step 4: Add the Whipped Topping
Once the pudding layer has set, it’s time to add that light, fluffy finish. Spread the thawed whipped topping evenly over the cake, creating a soft white cloud that invites you in. This topping balances the sweetness and adds an irresistible creaminess atop the vanilla pudding layer.
Step 5: Decorate Your Easter Bunny
This is the most fun part of the Easter Bunny Poke Cake Recipe—bringing your bunny to life! Use pastel-colored jelly beans or candy-coated chocolates to create patterns or the bunny’s face right on the cake. Sprinkle shredded coconut to form bunny ears, dyeing it pink for a cute touch or leaving it white for a classic look. Add candy eyes and licorice strips for whiskers and mouths to complete the playful bunny personality. It’s an artistic moment that kids will especially enjoy helping with!
Step 6: Chill and Serve
After decorating, chill the cake for another 30 minutes to let everything set perfectly before slicing. The refrigerator will help the pudding and whipped topping layers firm up nicely, making each piece a creamy, festive delight. Once chilled, slice, serve, and watch your guests’ faces light up with joy!
How to Serve Easter Bunny Poke Cake Recipe
Garnishes
Beyond the jelly beans and coconut ears, you can elevate your Easter Bunny Poke Cake Recipe with fresh pastel-colored sprinkles, a dusting of powdered sugar, or even edible glitter for an extra sparkle that catches the light. Mini chocolate eggs or tiny marshmallow chicks also add playful texture and a pop of added sweetness.
Side Dishes
This cake pairs wonderfully with light, refreshing sides like fresh berries, a simple fruit salad, or a citrus sorbet to contrast the richness. For a brunch setting, offer alongside a cup of herbal tea or freshly brewed coffee, balancing the dessert’s sweetness with complementary flavors.
Creative Ways to Present
For a show-stopping Easter centerpiece, serve your Easter Bunny Poke Cake Recipe on a decorative platter surrounded by spring flowers, pastel-colored napkins, and coordinating tableware. You can also make individual serving cups by cutting smaller portions into squares and layering them with extra whipped topping and jelly beans on top for an edible party favor style treat.
Make Ahead and Storage
Storing Leftovers
Leftover Easter Bunny Poke Cake Recipe is best stored covered in the refrigerator to maintain moisture and freshness. Seal it tightly with plastic wrap or place it in an airtight container, and enjoy it within 3 to 4 days for best taste and texture.
Freezing
If you want to make this cake ahead for a larger crowd, it can be frozen after the pudding and whipped topping layers are added. Wrap the cake tightly in plastic wrap and foil to prevent freezer burn, and freeze for up to 2 months. Thaw it overnight in the refrigerator before serving to preserve that creamy, dreamy texture.
Reheating
This cake is best enjoyed cold or at room temperature, so reheating is generally not recommended. If needed, simply let the cake sit out for 30 minutes after removing it from the refrigerator to soften up before serving.
FAQs
Can I use homemade cake instead of box mix for the Easter Bunny Poke Cake Recipe?
Absolutely! While the box mix makes the recipe quick and reliable, a homemade white or yellow cake recipe works just as well, as long as the cake is sturdy enough to hold the puddings and poking process.
What if I don’t have instant vanilla pudding mix?
You can substitute with homemade vanilla pudding, but be sure to let it thicken completely before pouring it over the cake. Instant mixes are a great shortcut but not mandatory.
Can I make this cake dairy-free or vegan?
With some ingredient swaps like dairy-free pudding mix, plant-based whipped topping, and egg replacers, you can adapt this Easter Bunny Poke Cake Recipe to suit those dietary needs, though the texture might differ slightly.
How far in advance can I assemble this cake?
You can prepare this cake a day ahead and keep it refrigerated. The flavors actually develop better with some resting time, making it ideal to make in advance for Easter festivities.
Are there other decoration ideas for the bunny face?
Definitely! You can use pretzel sticks for whiskers, fruit leather for the mouth, or colored icing for extra detailing. The key is to have fun and personalize your bunny’s adorable expression.
Final Thoughts
If you want to add a burst of springtime joy and a touch of whimsy to your dessert repertoire, the Easter Bunny Poke Cake Recipe is an absolute must-try. It’s easy to make, wonderfully tasty, and guaranteed to be the centerpiece of your Easter table that sparks smiles and laughter. I promise once you try it, this charming bunny cake will become an endearing tradition in your home for years to come.
Print
Easter Bunny Poke Cake Recipe
- Prep Time: 15 minutes
- Cook Time: 30 minutes
- Total Time: 2 hours 15 minutes
- Yield: 12 servings
- Category: Dessert
- Method: Baking
- Cuisine: American
- Diet: Vegetarian
Description
This festive Easter Bunny Poke Cake is a delightful and fun dessert perfect for spring celebrations. A moist white or yellow cake is baked and then poked with holes to be filled with creamy instant vanilla pudding. Topped with fluffy whipped topping and decorated with colorful jelly beans, shredded coconut, and candy accents, this cake is as charming as it is delicious, making it a hit with kids and adults alike.
Ingredients
Cake
- 1 box (18.25 oz) white or yellow cake mix
- 3 large eggs
- 1 cup water
- 1/2 cup vegetable oil
Filling
- 1 package (3.4 oz) instant vanilla pudding mix
- 2 cups cold milk
Topping and Decorations
- 1 container (8 oz) whipped topping (such as Cool Whip), thawed
- Pastel-colored jelly beans or candy-coated chocolates (e.g., M&M’s)
- 1 cup shredded coconut (dyed pink or left white for bunny ears)
- Optional: Candy eyes, licorice strips, or other decorations for bunny faces
Instructions
- Preheat Oven and Prepare Pan: Preheat your oven to 350°F (175°C) and grease a 9×13-inch baking dish to prevent sticking.
- Make Cake Batter and Bake: In a large bowl, combine the cake mix with eggs, water, and vegetable oil. Mix until smooth, then pour into the prepared pan. Bake according to the package directions, about 25-30 minutes, until a toothpick inserted comes out clean.
- Cool and Poke Holes: Allow the cake to cool for 10 minutes. Using the handle of a wooden spoon, gently poke holes all over the cake to prepare for the pudding filling.
- Prepare Pudding Filling: In a separate bowl, whisk the instant vanilla pudding mix with cold milk until thickened. Pour the pudding evenly over the cake, ensuring it fills the holes. Refrigerate the cake for 1 hour to set.
- Add Whipped Topping: Once chilled, spread the whipped topping evenly over the pudding-coated cake to create a smooth, creamy surface.
- Decorate the Cake: Use pastel jelly beans or candy-coated chocolates to create Easter patterns or bunny faces on the cake. Sprinkle shredded coconut on top, shaping it into bunny ears if desired.
- Finish Decorations: If preferred, add candy eyes, licorice strips, or other decorations to complete the bunny faces for an extra festive look.
- Final Chill and Serve: Chill the decorated cake for another 30 minutes to set everything in place before slicing and serving.
Notes
- Make sure the pudding is completely thickened before pouring over the cake for best results.
- For vibrant bunny ears, dye the shredded coconut pink using a few drops of food coloring.
- Whipped topping should be fully thawed for easy spreading.
- Store the cake in the refrigerator to keep it fresh, especially because of the pudding and whipped topping.
- Use a spoon handle that isn’t too sharp to avoid damaging the cake structure when poking holes.
