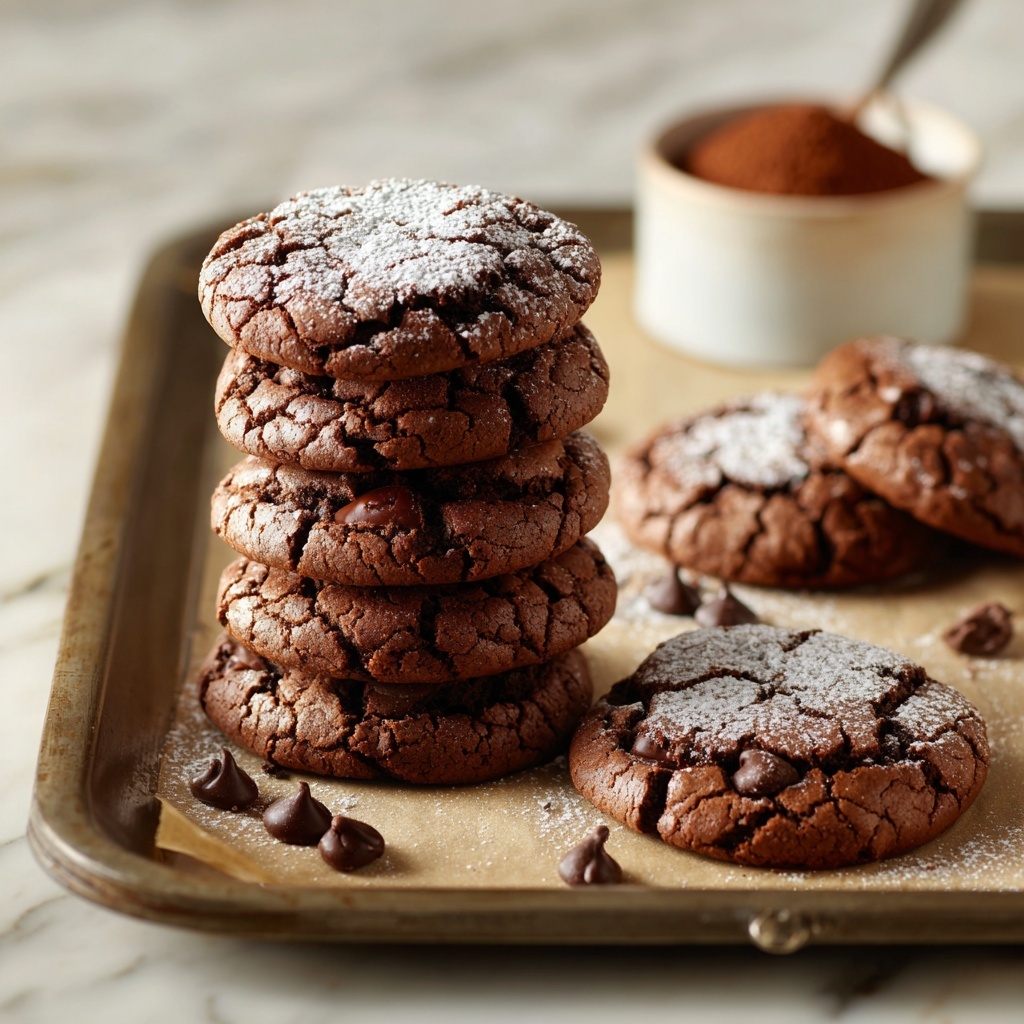
If you’re craving a cookie that’s both indulgently rich and satisfyingly simple, then the Dutch Cocoa Cookies Recipe is here to brighten your baking adventures. Imagine biting into a tender, chocolaty treat where the deep, complex flavor of Dutch-process cocoa shines through every bite—balanced perfectly with a hint of sweetness and a soft, chewy texture. This recipe has become a beloved classic for those who adore the pure, robust taste of cocoa paired with the comforting warmth of home-baked cookies. Whether you’re an experienced baker or a kitchen newbie, these cookies promise an effortless way to create something truly delightful.

Ingredients You’ll Need
The beauty of the Dutch Cocoa Cookies Recipe lies in its straightforward ingredients list. Each component plays a crucial role, whether it’s to enhance texture, enrich flavor, or add that classic cookie color that draws you in before you even take a bite.
- 1 cup all-purpose flour: Provides the structure and chewiness that make these cookies so satisfying.
- 1/2 cup Dutch-process cocoa powder: This special cocoa lends a mellow, rich chocolate flavor and a beautiful dark color.
- 1/2 teaspoon baking soda: Helps the cookies rise just enough for a soft, tender crumb.
- 1/4 teaspoon salt: Balances the sweetness and enhances the chocolate notes.
- 1/2 cup unsalted butter, softened: Adds richness and moisture, ensuring a melt-in-your-mouth texture.
- 3/4 cup granulated sugar: Sweetens the dough while keeping the cookie edges crisp.
- 1/4 cup brown sugar, packed: Brings a deep caramel-like flavor and extra chewiness.
- 1 large egg: Binds the ingredients together and adds softness.
- 1 teaspoon pure vanilla extract: Gives a sweet, aromatic hint that complements the cocoa perfectly.
- 1/2 cup chocolate chips (optional): For those extra pockets of chocolatey bliss in every bite.
How to Make Dutch Cocoa Cookies Recipe
Step 1: Prep Your Oven and Workspace
Start by preheating your oven to 350°F (175°C) and lining a baking sheet with parchment paper or a silicone mat. This step ensures your cookies bake evenly and can be removed easily without sticking. Getting this ready upfront sets you up for smoother baking.
Step 2: Combine the Dry Ingredients
In a medium bowl, whisk together the all-purpose flour, Dutch-process cocoa powder, baking soda, and salt. By blending these dry ingredients well, you ensure that every cookie will have consistent flavor and texture.
Step 3: Cream the Butter and Sugars
Using a large bowl, beat the softened butter with granulated sugar and brown sugar until the mixture becomes light and fluffy, usually around 2 to 3 minutes. This creaming process incorporates air, giving your cookies a tender bite and a lovely rise.
Step 4: Add Egg and Vanilla
Mix in the egg and vanilla extract until fully combined. This step enriches your dough and infuses it with a subtle vanilla fragrance that complements the cocoa beautifully.
Step 5: Combine Wet and Dry
Gradually add the dry ingredient mixture to the wet ingredients, stirring gently until just combined. Be careful not to overmix, as this can lead to tougher cookies rather than the soft, tender texture you’re aiming for.
Step 6: Fold in Chocolate Chips (Optional)
If you’re choosing to include chocolate chips, fold them into your batter now. These little gems melt just enough during baking to create extra gooey chocolate moments without overwhelming the cocoa’s deeper flavor.
Step 7: Shape the Cookies
Using a tablespoon, scoop your dough into balls and place them roughly 2 inches apart on your prepared baking sheet. This spacing allows the cookies to spread just enough for that perfect balance of crisp edges and soft centers.
Step 8: Bake Until Perfect
Pop the baking sheet into the preheated oven and bake for 10 to 12 minutes. Look for edges that are set but centers still soft—this is the sweet spot for that irresistible chewy texture.
Step 9: Cool and Enjoy
Let your cookies cool on the baking sheet for about 5 minutes before transferring them to a wire rack to cool completely. This resting time lets the cookies firm up slightly while retaining their tender bite.
How to Serve Dutch Cocoa Cookies Recipe

Garnishes
While the Dutch Cocoa Cookies Recipe stands beautifully on its own, consider a light dusting of powdered sugar or a drizzle of melted white chocolate for an elegant touch. Sprinkling flaky sea salt over the warm cookies right after baking intensifies the chocolate flavor and adds a perfect salty-sweet contrast.
Side Dishes
These cookies pair wonderfully with a glass of cold milk or a steaming cup of coffee or hot cocoa. The creamy beverage complements the rich cocoa flavor and balances the sweetness for a truly comforting snack or dessert.
Creative Ways to Present
For a fun twist, sandwich two Dutch Cocoa Cookies with a scoop of vanilla ice cream or your favorite frosting for an irresistible cookie ice cream sandwich. Alternatively, you can crumble the cookies over yogurt or puddings to add texture and burst of chocolatey goodness.
Make Ahead and Storage
Storing Leftovers
Keep any leftover Dutch Cocoa Cookies in an airtight container at room temperature for up to 4 days. This method maintains their soft texture and keeps them fresh to enjoy as an anytime treat.
Freezing
You can freeze the baked cookies by placing them in a sealed freezer bag or container, separating layers with parchment paper. They’ll stay delicious for up to 3 months—perfect for making ahead or saving some for later cravings.
Reheating
To revive the soft, warm feeling of freshly baked cookies, warm them in a microwave for about 15 seconds or in a preheated oven at 300°F (150°C) for 5 minutes. This quick reheating brings back that freshly baked charm effortlessly.
FAQs
Can I substitute regular cocoa powder for Dutch-process cocoa in this recipe?
You can, but the flavor and color will be slightly different. Dutch-process cocoa has a smoother, more mellow flavor and darker hue, while regular cocoa is more acidic and sharper. Adjusting baking soda amounts might be necessary to balance the acidity.
Are the chocolate chips necessary to make the Dutch Cocoa Cookies Recipe?
Not at all! The cookies are delicious on their own thanks to the rich Dutch cocoa flavor. Chocolate chips are an optional addition for extra pockets of melty chocolate but certainly not required.
Can I make these cookies gluten-free?
Yes, by substituting the all-purpose flour with a gluten-free flour blend suitable for baking, you can enjoy a gluten-free version. Just make sure your blend contains xanthan gum or a similar binder for the best texture.
How do I know when the cookies are perfectly baked?
Look for edges that are slightly firm and set, while the centers should remain soft to the touch. They will continue to firm up a bit during cooling, resulting in that tender chewiness.
Can I double the recipe?
Absolutely! This Dutch Cocoa Cookies Recipe scales up well. Just be sure to mix in batches if your equipment can’t handle larger volumes, and watch the baking time closely, as it might vary slightly.
Final Thoughts
I hope you feel inspired to whip up this Dutch Cocoa Cookies Recipe soon—it’s one of those simple pleasures that never fails to bring a smile. With just a handful of ingredients and straightforward steps, you’ll have a batch of delectably rich, chewy cookies that feel like a warm hug from the inside out. Happy baking, and may your kitchen be filled with the irresistible aroma of cocoa and happiness!
Print
Dutch Cocoa Cookies Recipe
- Prep Time: 10 minutes
- Cook Time: 12 minutes
- Total Time: 22 minutes
- Yield: 18 cookies
- Category: Dessert
- Method: Baking
- Cuisine: American
- Diet: Vegetarian
Description
These Dutch Cocoa Cookies are rich, soft, and wonderfully chocolatey, made with Dutch-process cocoa powder for an intense, deep chocolate flavor. Perfectly chewy with a tender center and slightly crisp edges, they are quick to prepare and ideal for satisfying your chocolate cravings.
Ingredients
Dry Ingredients
- 1 cup all-purpose flour
- 1/2 cup Dutch-process cocoa powder
- 1/2 teaspoon baking soda
- 1/4 teaspoon salt
Wet Ingredients
- 1/2 cup unsalted butter, softened
- 3/4 cup granulated sugar
- 1/4 cup packed brown sugar
- 1 large egg
- 1 teaspoon pure vanilla extract
Optional
- 1/2 cup chocolate chips
Instructions
- Preheat and prepare baking sheet: Preheat your oven to 350°F (175°C) and line a baking sheet with parchment paper or a silicone baking mat to prevent sticking and facilitate easy cleanup.
- Mix dry ingredients: In a medium bowl, whisk together the all-purpose flour, Dutch-process cocoa powder, baking soda, and salt until evenly combined, then set aside.
- Cream butter and sugars: Using a mixer in a large bowl, beat the softened unsalted butter, granulated sugar, and brown sugar together for 2-3 minutes until the mixture is light and creamy, ensuring a smooth texture.
- Add egg and vanilla: Mix in the large egg and pure vanilla extract to the creamed butter and sugar mixture until fully incorporated for a rich, flavorful base.
- Combine wet and dry ingredients: Gradually add the dry ingredients into the wet mixture, stirring gently until just combined. Be careful not to overmix to keep the cookies tender.
- Fold in chocolate chips: If desired, fold in chocolate chips for added bursts of chocolate in every bite.
- Shape the cookies: Scoop tablespoon-sized balls of dough onto the prepared baking sheet, spacing them about 2 inches apart to allow for spreading.
- Bake: Bake in the preheated oven for 10-12 minutes, until the edges are set but the centers remain soft and slightly underbaked for the perfect chewy texture.
- Cool: Let the cookies cool on the baking sheet for 5 minutes, then transfer them to a wire rack to cool completely, allowing them to firm up.
Notes
- For extra crunch, bake a minute or two longer, but be careful not to overbake.
- You can substitute chocolate chips with chopped nuts or omit them for a simple cocoa cookie.
- Store cookies in an airtight container at room temperature for up to 5 days.
- To freeze, shape dough balls and freeze on a tray, then transfer to a bag; bake from frozen adding 1-2 minutes to baking time.

