Description
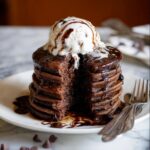
Delicious and fluffy Chocolate Protein Pancakes that combine the rich flavor of cocoa with the added benefit of protein powder. Perfect for a nutritious breakfast or post-workout meal, these pancakes are easy to make and customizable with your choice of flour and milk. Enjoy them topped with maple syrup, Greek yogurt, or mini chocolate chips for an indulgent yet healthy treat.
Ingredients
Scale
Dry Ingredients
- 1 cup flour (120g) (can use spelt, oat, gluten free, or white all-purpose flour)
- 1/4 cup chocolate protein powder (32g)
- 2 tbsp unsweetened cocoa powder or Dutch cocoa powder (10g)
- 2 1/2 tsp baking powder
- 1/2 tsp salt
- 1/8 tsp baking soda
Wet Ingredients
- 3/4 cup milk of choice (180g)
- 2 tbsp pure maple syrup (30g) or sweetener of choice
- 1 tbsp oil (12g), peanut butter, or mashed banana
- 1 large egg or 1/4 cup mashed banana or applesauce
- 1/2 tsp pure vanilla extract (2g)
- 1 tsp apple cider vinegar (5g)
Optional
- 6 oz Greek yogurt or dairy-free alternative (170g)
- Mini chocolate chips for topping
Instructions
- Combine Dry Ingredients: Whisk together all dry ingredients — flour, chocolate protein powder, cocoa powder, baking powder, salt, and baking soda — thoroughly in a large measuring cup or bowl to ensure even distribution.
- Add Wet Ingredients: Stir in the milk, maple syrup, oil, egg, vanilla extract, and apple cider vinegar to the dry mixture until just combined. Add more milk if you prefer a thinner batter suitable for thinner pancakes.
- Rest the Batter: For fluffier pancakes, let the batter rest for 10 minutes at room temperature or cover and refrigerate overnight. This allows the leavening agents to activate fully.
- Preheat Pan or Griddle: Grease a pancake griddle or nonstick skillet and heat over medium heat. Test readiness by flicking a drop of water onto the surface; it should sizzle immediately.
- Cook Pancakes: Ladle approximately 2 tablespoons of batter per pancake onto the heated surface, spacing them apart. Use a spoon or spatula to level the batter so the centers are not thicker than the edges, ensuring even cooking.
- Flip Pancakes: When edges start to look dry and bubbles form on the surface, carefully flip each pancake. Cook for an additional minute or until the pancakes are cooked through in the center.
- Repeat and Grease: Re-grease the skillet or griddle between batches to prevent sticking and maintain even browning.
- Serve: Serve the pancakes hot with your choice of pure maple syrup, high protein Greek yogurt, and optionally sprinkle mini chocolate chips on top for extra indulgence.
- Store Leftovers: Refrigerate or freeze any leftover pancakes in an airtight container for up to five days. Reheat before serving to enjoy them warm.
Notes
- The recipe is flexible with flour type — use spelt, oat, gluten-free, or all-purpose flour according to dietary needs or preferences.
- For a vegan alternative, substitute eggs with mashed banana or applesauce.
- Allowing the batter to rest enhances fluffiness by activating the baking powder and soda.
- Adjust milk quantity to achieve your desired pancake thickness.
- Re-greasing the pan between batches ensures pancakes don’t stick and cook evenly.
- Leftover pancakes freeze well and make convenient quick meals or snacks.