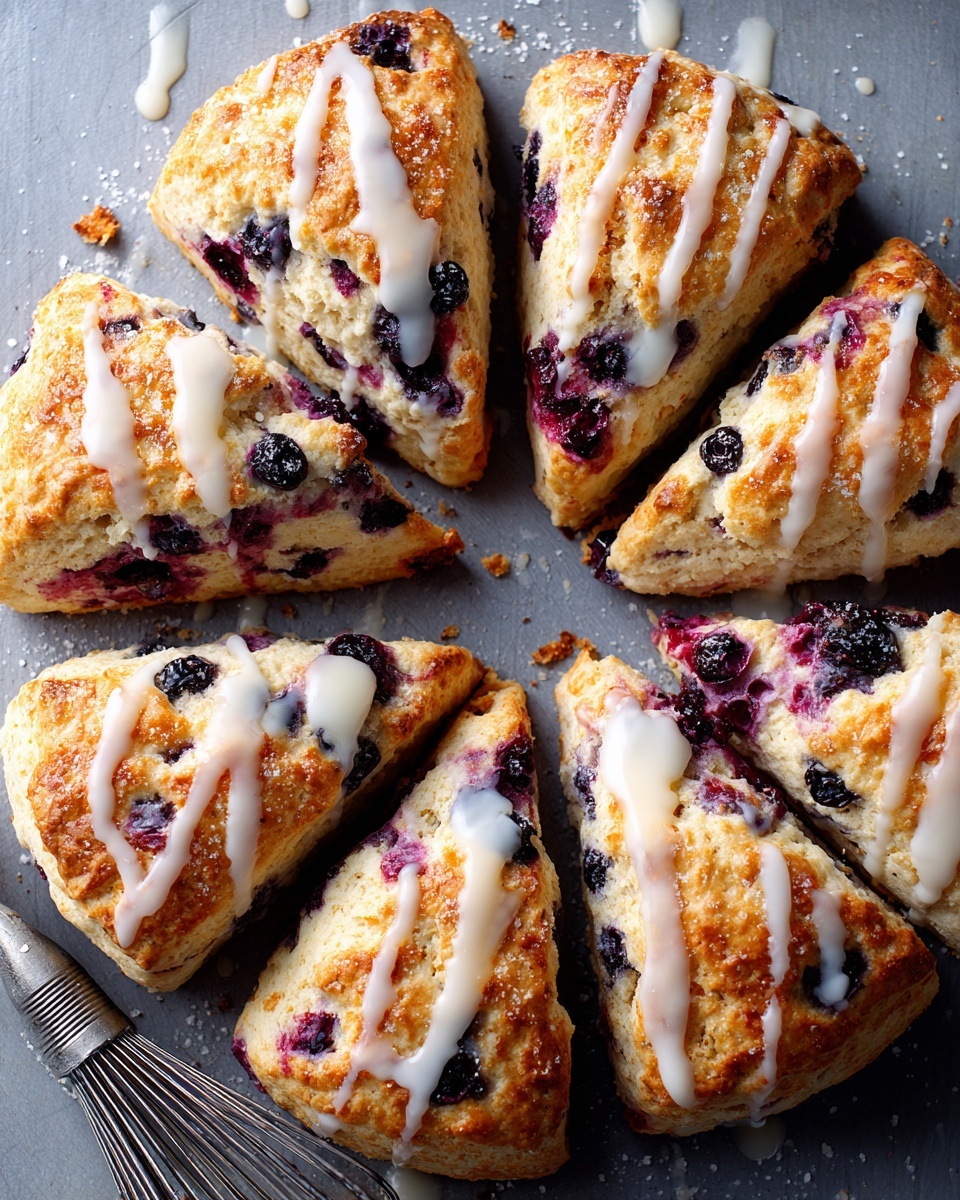
This Basic Scones Recipe (Customizable for Any Flavor) Recipe is a true keeper for anyone who loves fresh, homemade baked goods. Picture buttery, tender scones with just the right hint of sweetness or a touch of savory goodness, ready to be tailored to your favorite tastes. Whether you’re craving classic blueberry bursts or the comforting richness of cheddar and chive, this recipe is your blank canvas, coming together quickly and effortlessly to match your mood or occasion. It’s a delightful way to elevate your breakfast or teatime with a personal touch every time.

Ingredients You’ll Need
The magic of this Basic Scones Recipe (Customizable for Any Flavor) Recipe lies in its simplicity. Each ingredient plays an essential role, from creating the perfect crumb to adding depth and balance in taste and texture.
- 2 cups all-purpose flour: The foundation that gives structure and a tender crumb to your scones.
- 1/3 cup granulated sugar: Adds sweetness, but can be varied for savory versions.
- 1 tablespoon baking powder: The rising agent that makes your scones fluffy and light.
- 1/2 teaspoon salt: Enhances flavor and balances sweetness.
- 6 tablespoons cold unsalted butter (cut into cubes): Key for that wonderfully flaky and tender texture.
- 2/3 cup heavy cream or buttermilk: Brings moisture and richness to the dough.
- 1 large egg: Binds ingredients and adds a lovely golden color.
- 1 teaspoon vanilla extract (optional): Adds subtle aromatic sweetness, perfect for sweet scones.
- 1 cup choice of add-ins: Chocolate chips, berries, dried fruit, nuts, or cheese and herbs to customize every batch.
- Optional coarse sugar for topping: Adds delightful crunch and sparkle on top of sweet scones.
How to Make Basic Scones Recipe (Customizable for Any Flavor) Recipe
Step 1: Preheat and Prepare
Start by heating your oven to a toasty 400°F (200°C). Prepare a baking sheet by lining it with parchment paper. This simple step ensures your scones bake evenly and don’t stick, setting the stage for perfect results.
Step 2: Combine Dry Ingredients
In a large mixing bowl, whisk together the flour, sugar, baking powder, and salt. This thorough mixing distributes your rising agents and seasoning so every bite is consistent and flavorful.
Step 3: Cut in the Butter
Add the cold butter cubes to the dry mix and work them in using a pastry cutter or your fingertips until the mixture looks like coarse crumbs. The coldness of the butter is crucial, as it creates steam during baking, puffing the scones into flakey goodness.
Step 4: Mix Wet Ingredients
In a separate bowl, whisk the heavy cream or buttermilk with the egg and vanilla extract if you are using it. This blend brings moisture and richness that transforms the dry ingredients into a silky, tender dough.
Step 5: Combine Wet and Dry
Pour the wet mixture into the bowl with the dry ingredients. Stir gently but thoroughly until just combined—avoid overmixing, so your scones stay tender and soft rather than tough.
Step 6: Add Your Flavor
Fold in your chosen add-ins such as chocolate chips or herbs carefully, so they’re evenly distributed without overworking the dough, which could cause dryness.
Step 7: Shape and Cut
Turn the dough onto a lightly floured surface and press it gently into a 1-inch thick circle. Using a sharp knife or bench scraper, cut the circle into 8 equal wedges to ensure uniform baking.
Step 8: Bake to Golden Perfection
Place your wedges on the baking sheet, brush the tops with a little cream or milk, and sprinkle with coarse sugar if you like a sweet crust. Bake for 16 to 20 minutes or until golden brown on top. Let them cool slightly before you dig in.
How to Serve Basic Scones Recipe (Customizable for Any Flavor) Recipe

Garnishes
Just out of the oven, scones shine with simple touches: a dusting of powdered sugar for sweet versions, a pat of butter melting on top, or a light swipe of clotted cream and jam to enhance that classic teatime feel.
Side Dishes
Pair these scones with comforting accompaniments like rich hot tea, freshly brewed coffee, or a refreshing fruit salad for a balanced and inviting spread that delights every palate.
Creative Ways to Present
For a fun twist, slice scones horizontally and layer with cream cheese and smoked salmon or nut butters and jam. You can also serve mini versions at brunch or slice larger scones as part of a dessert platter to impress your guests.
Make Ahead and Storage
Storing Leftovers
If you happen to have any leftovers, store them in an airtight container at room temperature for up to 2 days. This keeps them soft but fresh enough for a quick snack or breakfast the next day.
Freezing
You can freeze unbaked scones by placing them on a tray until firm and then transferring into a freezer bag. When ready to bake, pop them in the oven straight from frozen—just add a few minutes to the baking time for that fresh-baked goodness.
Reheating
To revive your scones, warm them in the oven at 325°F (160°C) for 5 to 7 minutes. This restores their tender texture and crispy exterior much better than a microwave.
FAQs
Can I use whole wheat flour instead of all-purpose flour?
Absolutely! Using whole wheat flour will give your scones a nuttier flavor and denser texture. You might want to substitute half the flour to keep the scones light and tender.
How do I make my scones less crumbly?
Be careful not to overmix the dough and ensure your butter is cold before cutting it in. Also, adding enough liquid to bind the dough is key to prevent crumbliness.
What flavors work best as add-ins?
The versatility of this Basic Scones Recipe (Customizable for Any Flavor) Recipe makes it great for everything from classic blueberries and chocolate chips to savory combinations like cheddar and chives or sun-dried tomato with herbs.
Can I make these scones dairy-free?
Yes! Substitute the butter with a dairy-free alternative and use almond milk or another plant-based milk instead of cream or buttermilk. It may slightly alter the texture but still delicious.
Should I brush my scones before baking?
Brushing with cream or milk adds a beautiful golden color and helps toppings like coarse sugar stick. For savory versions, a little beaten egg works wonderfully for a shiny finish.
Final Thoughts
There is something incredibly rewarding about making scones from scratch, and this Basic Scones Recipe (Customizable for Any Flavor) Recipe is your ultimate guide to crafting warm, delicious scones with endless possibilities. Whether you’re rolling out a batch for an indulgent weekend brunch or a quick weekday treat, these scones promise comfort and joy in every bite. So pull out your mixing bowl, pick your favorite add-ins, and enjoy the wonderful journey of baking your perfect scone!
Print
Basic Scones Recipe (Customizable for Any Flavor) Recipe
- Prep Time: 15 minutes
- Cook Time: 18 minutes
- Total Time: 33 minutes
- Yield: 8 scones
- Category: Breakfast
- Method: Baking
- Cuisine: British-American
- Diet: Vegetarian
Description
This basic scones recipe is buttery, tender, and lightly sweet—perfect as a foundation for any flavor variation you like, from classic blueberry to savory cheddar and chive. The dough comes together quickly and can be adapted with your favorite add-ins to create scones that suit any mood or occasion.
Ingredients
Dry Ingredients
- 2 cups all-purpose flour
- 1/3 cup granulated sugar
- 1 tablespoon baking powder
- 1/2 teaspoon salt
Wet Ingredients
- 6 tablespoons cold unsalted butter, cut into cubes
- 2/3 cup heavy cream or buttermilk (plus more for brushing)
- 1 large egg
- 1 teaspoon vanilla extract (optional)
Add-ins and Toppings
- 1 cup of your choice of add-ins (e.g., chocolate chips, berries, dried fruit, nuts, or cheese and herbs)
- Optional coarse sugar for topping
Instructions
- Preheat Oven and Prepare Baking Sheet: Preheat the oven to 400°F (200°C) and line a baking sheet with parchment paper to prevent sticking.
- Combine Dry Ingredients: In a large bowl, whisk together the flour, sugar, baking powder, and salt to ensure even distribution of leavening agents and seasoning.
- Cut in the Butter: Add the cold, cubed unsalted butter to the dry ingredients. Using a pastry cutter or your fingertips, cut the butter into the mixture until it resembles coarse crumbs, which helps create a flaky texture.
- Mix Wet Ingredients: In a separate bowl, whisk together the heavy cream or buttermilk, egg, and vanilla extract if using. This liquid mixture will bind the dry ingredients and add moisture.
- Combine Wet and Dry Mixtures: Pour the wet ingredients into the dry ingredients and gently stir until just combined. Avoid overmixing to keep the scones tender.
- Fold in Add-ins: Fold in your chosen add-ins such as chocolate chips, berries, nuts, or herbs carefully to evenly distribute without overworking the dough.
- Shape the Dough: Turn the dough out onto a floured surface. Gently pat it into a 1-inch thick circle to ensure even baking, then cut into 8 equal wedges.
- Prepare for Baking: Place the wedges onto the prepared baking sheet. Brush the tops with a little cream or milk and sprinkle with coarse sugar if desired for a sparkling finish.
- Bake: Bake for 16–20 minutes or until the scones are golden brown, indicating they are cooked through and have a crisp exterior.
- Cool and Serve: Allow the scones to cool slightly on a rack before serving to let them set and finish cooking internally.
Notes
- For a sweeter scone, increase the sugar slightly; for a savory version, omit sugar and vanilla.
- You can freeze unbaked scones on a tray, then transfer to a bag and bake directly from frozen, adding a few extra minutes to the bake time.


