
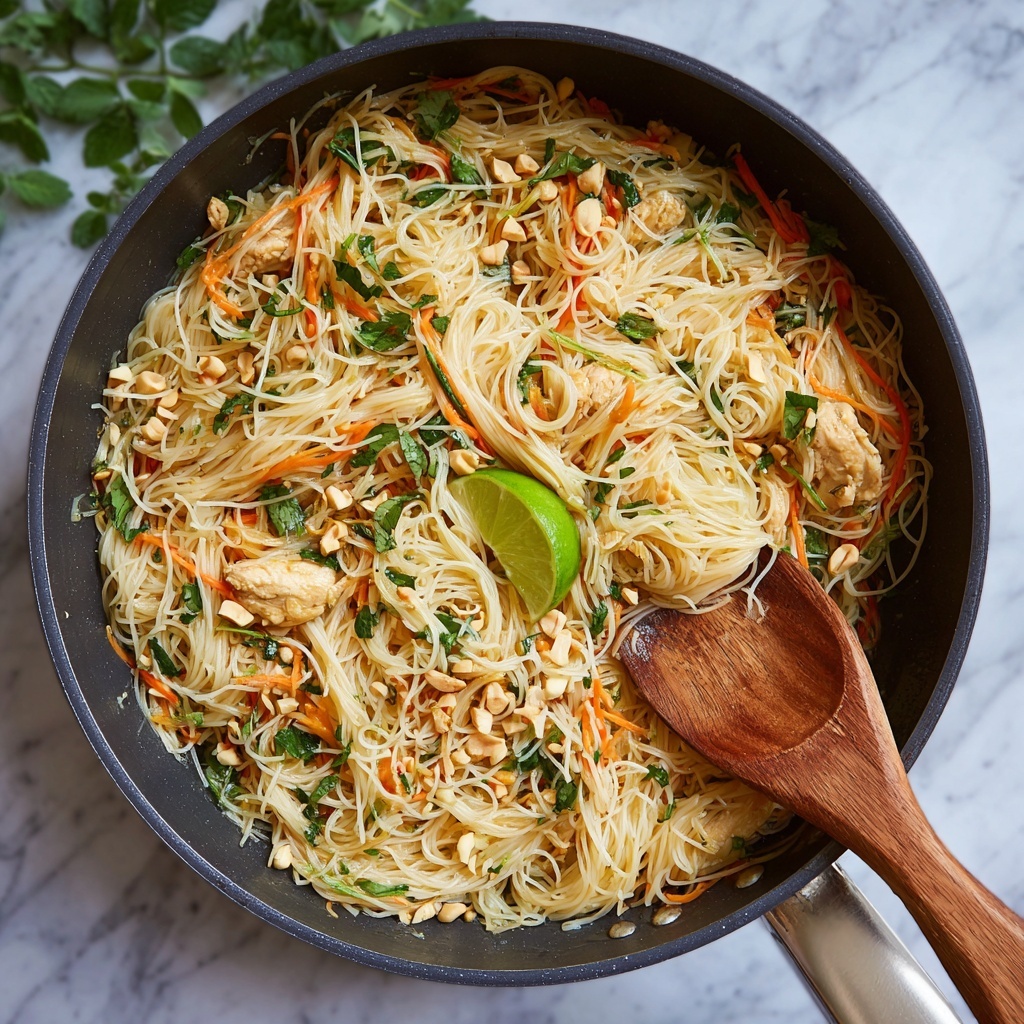
If you have ever craved a dish that perfectly balances sweet, sour, salty, and savory flavors all wrapped up in a satisfying noodle bite, then this Authentic Chicken Pad Thai Recipe is exactly what you need. Bursting with vibrant textures from crunchy peanuts and fresh bean sprouts to tender chicken and silky noodles, this classic Thai street food favorite brings an explosion of flavor to your very own kitchen. It’s not only delicious but also surprisingly simple to create, making it an absolute must-try for fans of Thai cuisine or anyone looking to spice up their dinner rotation with something truly special.
Ingredients You’ll Need
The magic of this dish lies in its straightforward but essential ingredients. Each item plays a crucial role in developing the rich, layered taste and satisfying texture that define an Authentic Chicken Pad Thai Recipe. From the chewy flat rice noodles to the punchy tamarind paste and fresh garnishes, every element contributes to the dish’s irresistible character.
- Flat rice noodles (8 oz / 225g): These are the tender, slightly chewy noodles that serve as the heart of the dish.
- Boneless, skinless chicken breast (12 oz / 340g): Thinly sliced for quick cooking and a lean protein addition.
- Garlic (3 cloves, minced): Adds a fragrant base and aromatic depth.
- Shallots (2, finely chopped): Their mild sweetness complements the garlic perfectly.
- Dried shrimp (2 tbsp, optional): Brings a hint of umami that deepens the flavor complexity.
- Vegetable oil (3 tbsp): Needed for stir-frying and achieving that perfect wok-sear.
- Eggs (2, lightly beaten): Adds richness and a silky texture contrast when scrambled in.
- Bean sprouts (2 cups): Provide a fresh, crunchy element that brightens the dish.
- Garlic chives (¼ cup, cut into 1-inch pieces): Infuse a delicate onion-garlic flavor that’s uniquely Thai.
- Roasted peanuts (¼ cup, crushed): For crunch and nutty warmth on top.
- Lime wedges: Essential for squeezing over the finished dish to add a zesty kick.
- Tamarind paste (3 tbsp): The tangy, slightly sweet foundational flavor of the sauce.
- Palm sugar (3 tbsp) or brown sugar: Balances the tartness with natural sweetness.
- Fish sauce (2 tbsp): Delivers the signature savory saltiness that defines authentic Pad Thai.
- Soy sauce (1 tbsp): Adds a touch of color and mild umami.
- Marinade for chicken: 1 tbsp soy sauce and 1 tsp cornstarch—helps tenderize and season the meat.
How to Make Authentic Chicken Pad Thai Recipe
Step 1: Prep the Noodles and Chicken
Start by soaking the flat rice noodles in warm water for 15 to 20 minutes. This softens them so they become pliable but still maintain a nice chew – which is essential for authentic Pad Thai texture. While the noodles soak, marinate your sliced chicken breast with soy sauce and cornstarch. This quick marinade tenderizes the meat and helps it develop a beautiful sear without drying out during stir-frying.
Step 2: Cook the Chicken and Eggs
Heat your wok or a large skillet over high heat and pour in the vegetable oil. The oil should shimmer but not smoke for the perfect cooking temperature. Add the marinated chicken, stir-frying quickly until it’s nearly cooked through and glazed on the outside. Push the chicken aside, crack in your beaten eggs, and scramble them lightly. Mixing the eggs and chicken together here builds a rich, cohesive base for your Pad Thai.
Step 3: Build Aroma with Shallots, Garlic, and Dried Shrimp
Next, toss in the minced garlic, finely chopped shallots, and if you’re using them, the dried shrimp. Stir-fry these aromatics until they become fragrant and golden, filling your kitchen with mouthwatering scents. This step layers in the complex flavors that are signature to an authentic Pad Thai experience, setting the stage for the sauce and noodles.
Step 4: Combine Noodles and Sauce
Drain your noodles and add them to the wok. Pour over the sauce made from tamarind paste, palm sugar, fish sauce, and soy sauce—all pre-mixed to a balanced blend of sweet, sour, and salty. Toss everything vigorously to coat each noodle strand in that glossy, flavorful sauce. The key is to stir-fry just long enough to finish cooking the noodles without making them mushy; chewy, vibrant noodles are the goal.
Step 5: Final Toss with Fresh Veggies
Add in your crunchy bean sprouts and garlic chives last for a fresh pop of texture and flavor. Using the residual heat, toss gently so the veggies soften slightly but retain their crispness. This crunch and burst of brightness elevate the dish, making every bite exciting and balanced.
Step 6: Serve Hot and Garnish
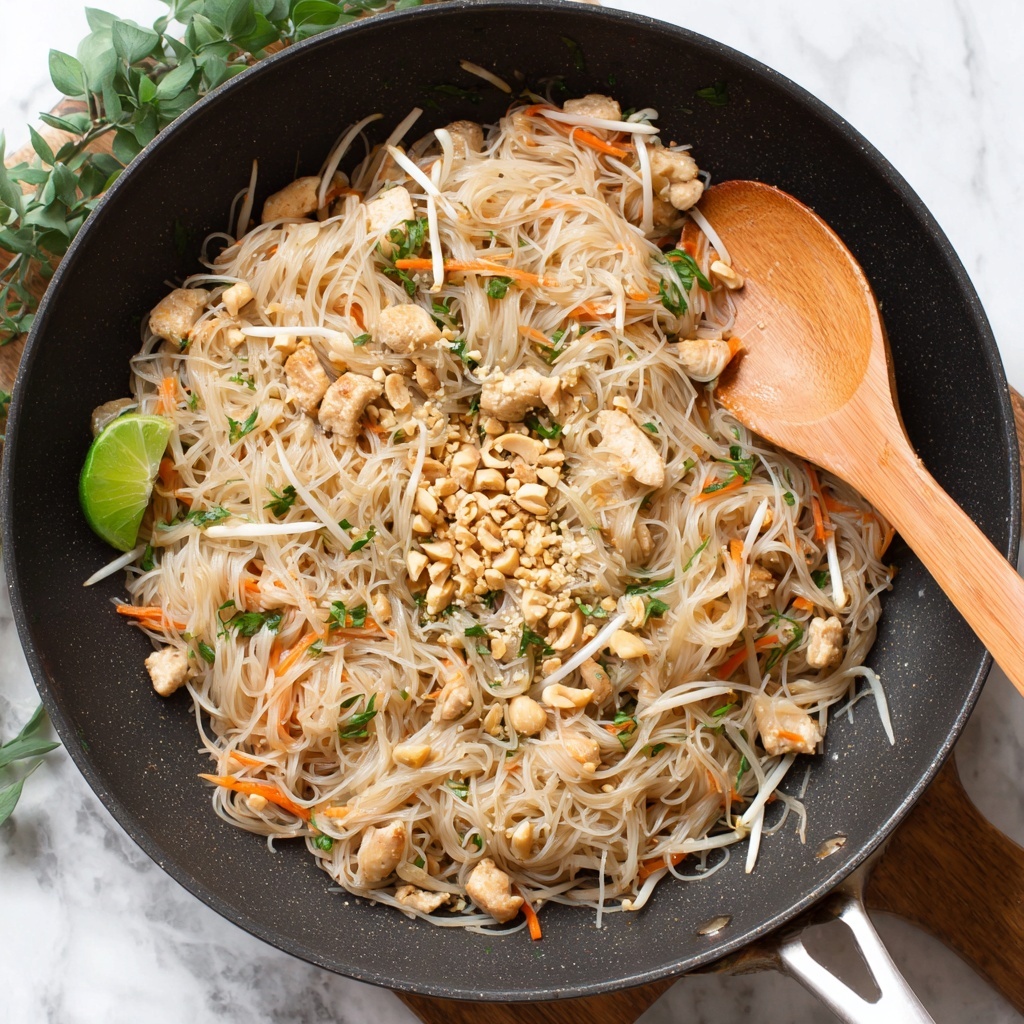
Plate your Authentic Chicken Pad Thai Recipe immediately while it’s piping hot. Garnish generously with crushed roasted peanuts for that delightful nutty crunch, extra bean sprouts for freshness, and lime wedges that invite a final zesty squeeze right before eating. These garnishes aren’t just decoration—they provide essential contrast and enhance the flavor profile of every mouthful.
How to Serve Authentic Chicken Pad Thai Recipe
Garnishes
Garnishes are where you personalize your dish. Crushed roasted peanuts add a toasty crunch, lime wedges lend a refreshing zing, and extra bean sprouts provide lightness and texture. Some chopped cilantro and a pinch of red chili flakes can also be wonderful for brightness and heat if you like a spicier kick.
Side Dishes
This dish shines as a filling main course on its own, but pairing it with crisp cucumber slices or a simple Thai green papaya salad can provide a refreshing counterpoint. Light soups like tom yum also complement the flavors nicely without overpowering the Pad Thai.
Creative Ways to Present
Make your Authentic Chicken Pad Thai Recipe party-ready by serving it family-style in a large platter with all garnishes arranged around the edges so guests can customize their plates. Alternatively, use edible banana leaves or vibrant plates to add a festive, tropical vibe that heightens the dining experience.
Make Ahead and Storage
Storing Leftovers
Leftover Pad Thai can be stored in an airtight container in the refrigerator for up to 2 days. For best results, refrigerate the noodles and garnishes separately to maintain the bean sprouts and peanuts’ crunchiness.
Freezing
Freezing Pad Thai isn’t recommended as the noodles tend to become mushy upon thawing. If you must, freeze only the sauce and raw marinated chicken separately and prepare fresh noodles when serving.
Reheating
To reheat, gently warm your Pad Thai in a non-stick skillet over medium heat, stirring frequently to prevent sticking. Add a splash of water or extra lime juice to refresh the flavors and moisture. Avoid microwaving as it can unevenly heat the noodles and make them soggy.
FAQs
Can I use other proteins instead of chicken?
Absolutely! Shrimp, tofu, or even thinly sliced beef work wonderfully in this recipe. Just adjust cooking times accordingly to ensure each protein is cooked perfectly without drying out.
Is tamarind paste hard to find?
Tamarind paste is available at most Asian grocery stores and many supermarkets in the international aisle. It’s crucial for that distinctive sweet-sour flavor, but if you’re in a pinch, mixing lime juice with a bit of brown sugar can somewhat mimic the taste.
Can this recipe be made vegetarian?
Yes, simply omit the chicken and dried shrimp, and use soy sauce or a vegetarian fish sauce substitute. Add extra tofu or mushrooms for protein, and load up on veggies for texture.
How spicy is this dish? Can I adjust the heat?
Traditional Pad Thai isn’t overly spicy, but you can easily control the heat by adding or reducing red chili flakes or fresh chilies to taste. It’s all about your personal preference!
What’s the secret to perfect Pad Thai noodles?
Soaking noodles just long enough until pliable but still firm is key. Also, stir-frying over high heat with proper tossing keeps them from sticking and helps retain that signature chewy texture.
Final Thoughts
There is something incredibly satisfying about mastering the Authentic Chicken Pad Thai Recipe in your own kitchen. It’s a celebration of flavors and textures that can brighten any mealtime and impress everyone at your table. So roll up your sleeves, get those ingredients ready, and dive into making this iconic dish – I promise you, it will soon become one of your all-time favorites too!
Print
Authentic Chicken Pad Thai Recipe
- Prep Time: 20 minutes
- Cook Time: 15 minutes
- Total Time: 35 minutes
- Yield: 4 servings
- Category: Main Course
- Method: Stovetop
- Cuisine: Thai
Description
This Authentic Chicken Pad Thai recipe offers a vibrant and flavorful Thai street food classic made with tender chicken, flat rice noodles, and a tangy tamarind sauce. Stir-fried with garlic, shallots, eggs, and garnished with crushed peanuts and lime wedges, this dish is perfect for a quick yet satisfying meal that brings the taste of Thailand to your kitchen in about 35 minutes.
Ingredients
Main Ingredients
- 8 oz (225g) flat rice noodles
- 12 oz (340g) boneless, skinless chicken breast, sliced
- 3 cloves garlic, minced
- 2 shallots, finely chopped
- 2 tbsp dried shrimp (optional)
- 3 tbsp vegetable oil
- 2 eggs, lightly beaten
- 2 cups bean sprouts
- 1/4 cup garlic chives, cut into 1-inch pieces
- 1/4 cup roasted peanuts, crushed
- Lime wedges for serving
Sauce Ingredients
- 3 tbsp tamarind paste
- 3 tbsp palm sugar (or brown sugar)
- 2 tbsp fish sauce
- 1 tbsp soy sauce
Chicken Marinade
- 1 tbsp soy sauce
- 1 tsp cornstarch
Garnishes (optional)
- Extra bean sprouts
- Chopped cilantro
- Red chili flakes (to taste)
Instructions
- Soak Noodles: Soak the flat rice noodles in warm water for about 15-20 minutes until they become pliable but retain some firmness. Drain and set aside.
- Marinate Chicken: In a bowl, combine the sliced chicken breast with 1 tablespoon soy sauce and 1 teaspoon cornstarch. Let it marinate briefly while preparing other ingredients.
- Cook Chicken: Heat a wok or large skillet over high heat and add 3 tablespoons of vegetable oil. Quickly stir-fry the marinated chicken until it’s nearly cooked through but still tender.
- Add Eggs: Push the chicken to one side of the wok. Pour in the lightly beaten eggs and scramble them slightly, then mix the eggs thoroughly with the chicken.
- Stir-Fry Aromatics: Add minced garlic, finely chopped shallots, and dried shrimp if using. Stir-fry until the mixture is fragrant, which should take about 1-2 minutes.
- Add Noodles and Sauce: Add the drained noodles to the wok. Pour in the prepared sauce made from tamarind paste, palm sugar, fish sauce, and soy sauce. Toss everything together well to combine and distribute the sauce evenly.
- Add Vegetables: Toss in the bean sprouts and garlic chives. Stir-fry everything until the noodles are cooked through but still slightly chewy, and the vegetables are crisp-tender.
- Serve: Plate the Pad Thai hot, garnished with crushed roasted peanuts, extra bean sprouts, and lime wedges. Optionally, add chopped cilantro and a sprinkle of red chili flakes for extra flavor and heat.
Notes
- You can substitute palm sugar with brown sugar if unavailable.
- If you prefer a vegetarian version, omit chicken and dried shrimp and use soy sauce instead of fish sauce.
- Adjust the level of tamarind paste and sugar to balance the sour and sweet flavors to your taste.
- Rice noodles come in varying thickness; choose flat noodles around 1/4 inch wide for authentic texture.
- Soaking noodles until just pliable helps prevent them from becoming mushy during stir-frying.
- Use a high heat and quick stir-frying to keep the chicken tender and vegetables crisp.
- Serve immediately for best texture and flavor.

