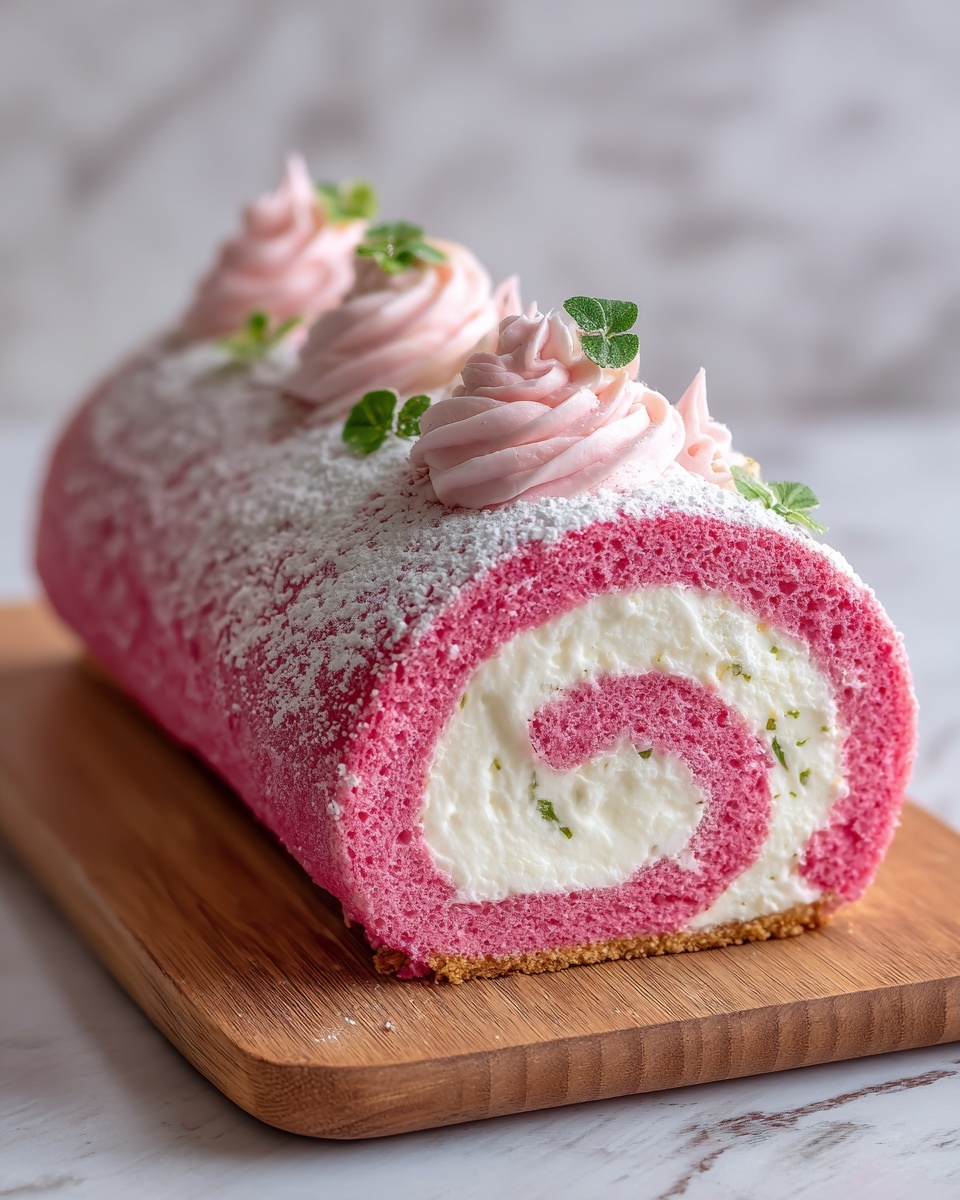
If you’re on the lookout for a dessert that’s as visually stunning as it is delicious, let me introduce you to this Pink Velvet Roll Cake Recipe. This dreamy, soft pink sponge wrapped around a luscious cream cheese filling is pure magic on a plate. It combines the smooth, moist texture of velvet cake with a delicate sweetness and a tangy filling that’s simply irresistible. Perfect for celebrations or just elevating your everyday dessert, this cake roll is a showstopper that everyone will rave about.

Ingredients You’ll Need
Gathering simple yet essential ingredients is the first step to nailing this Pink Velvet Roll Cake Recipe. Each component plays a crucial role in achieving the cake’s lightness, beautiful color, and creamy filling, blending perfectly to create a slice of heaven.
- 3/4 cup all-purpose flour: Provides structure while remaining tender.
- 1/4 cup cornstarch: Lightens the cake for that melt-in-your-mouth texture.
- 1 teaspoon baking powder: Helps the cake rise softly.
- 1/4 teaspoon salt: Balances sweetness and enhances flavors.
- 4 large eggs (room temperature): Whipped for volume and richness.
- 3/4 cup granulated sugar: Sweetens while helping with the cake’s tender crumb.
- 1/4 cup vegetable oil: Keeps the sponge moist and supple.
- 1/4 cup buttermilk: Adds tang and keeps the cake tender.
- 1 teaspoon vanilla extract: Brings warmth and depth to the flavor.
- 1/4 teaspoon almond extract (optional): Adds a subtle nutty note, like bakery magic.
- Pink gel food coloring: For the lovely pink hue that makes this cake so special.
- Powdered sugar (for dusting): Prevents sticking and adds a touch of sweetness.
- 8 oz cream cheese (softened): The star of the filling – smooth and tangy.
- 1/2 cup unsalted butter (softened): Adds richness to the frosting.
- 1 1/2 cups powdered sugar: Sweetens the filling to perfection.
- 1 teaspoon vanilla extract: Enhances the cream cheese filling’s flavor.
How to Make Pink Velvet Roll Cake Recipe
Step 1: Prepare Your Oven and Dry Ingredients
Start by preheating your oven to 350°F and lining a 10×15-inch jelly roll pan with parchment paper, leaving overhang for easy cake removal later. Sift together your flour, cornstarch, baking powder, and salt in a medium bowl to ensure your dry ingredients blend well and avoid lumps, laying a solid foundation for the sponge.
Step 2: Whip Your Eggs and Sugar
In a large bowl, use an electric mixer to beat your room-temperature eggs until thick and pale—this should take around 5 minutes. Slowly add the granulated sugar while continuing to mix. This process is key for a light, airy sponge that will roll beautifully without cracking.
Step 3: Combine Wet Ingredients and Add Color
Mix in the vegetable oil, buttermilk, vanilla extract, and the optional almond extract until fully combined. Now, add a few drops of pink gel food coloring and stir until you achieve that perfect soft pink shade—feel free to adjust the amount for a deeper or lighter hue.
Step 4: Fold in Dry Ingredients
Gently fold the sifted dry ingredients into the wet mixture. The goal here is to incorporate them smoothly without deflating the batter’s airiness. A light, careful touch is what keeps your cake tender and soft.
Step 5: Bake and Roll
Pour the batter evenly into the prepared pan and smooth the surface. Bake for 10 to 12 minutes or until a gentle touch makes the cake spring back. As soon as you remove it from the oven, invert the cake onto a clean kitchen towel dusted heavily with powdered sugar. Carefully peel off the parchment paper, then roll the cake up in the towel starting from the short end to help it cool while keeping that perfect roll shape.
Step 6: Make the Cream Cheese Filling
While the cake cools, beat the softened cream cheese and butter together until smooth and creamy. Add the powdered sugar and vanilla extract, then whip until fluffy and irresistible. This filling is the perfect balance of creamy tang and sweetness to complement the pink velvet sponge.
Step 7: Assemble the Cake Roll
Once the cake is completely cool, carefully unroll it and spread the cream cheese filling evenly over the surface. Then, gently re-roll the cake, this time without the towel, to create a neat roll. Wrap it tightly in plastic wrap and pop it in the refrigerator for at least an hour to set before slicing.
How to Serve Pink Velvet Roll Cake Recipe

Garnishes
Simple garnishes can elevate this cake’s presentation spectacularly. Sprinkle a little powdered sugar on top for an elegant dusting or pop on some edible flowers or fresh raspberries for a splash of natural color and extra freshness that pairs beautifully with the pink hues and cream cheese filling.
Side Dishes
This Pink Velvet Roll Cake Recipe pairs wonderfully with a cup of freshly brewed coffee or a fragrant tea, making for a delightful afternoon treat. For brunch gatherings, serve alongside fresh berries or a citrus salad to balance the cake’s sweet richness and bring refreshing contrast.
Creative Ways to Present
Feeling fancy? Slice the roll thinly and arrange the pieces vertically on a dessert platter to show off the swirl pattern or layer slices with whipped cream and fresh fruit in clear glasses for individual parfait-style servings. These playful presentations make your Pink Velvet Roll Cake feel extra special for guests.
Make Ahead and Storage
Storing Leftovers
Once wrapped tightly in plastic, leftover slices of this Pink Velvet Roll Cake Recipe will stay fresh in the refrigerator for up to 3 days. Keeping it chilled not only preserves freshness but also maintains the lovely texture of the cream cheese filling.
Freezing
If you want to enjoy this cake later, you can freeze it wrapped well in plastic wrap and aluminum foil to protect against freezer burn. Freeze for up to one month and thaw overnight in the fridge before serving to enjoy that freshly made texture and flavor.
Reheating
Since this is a delicate cake roll with cream cheese filling, it’s best enjoyed chilled or at room temperature. Reheating is not recommended as it can cause the filling to separate or the cake to dry out. Just take it out of the fridge about 10–15 minutes before serving for the best flavor and softness.
FAQs
Can I use regular milk instead of buttermilk?
Yes, you can substitute regular milk, but I recommend adding a teaspoon of lemon juice or white vinegar to mimic the buttermilk’s acidity. This helps keep the cake tender and enhances the flavor in this Pink Velvet Roll Cake Recipe.
What if I don’t have pink gel food coloring?
While gel food coloring gives the best vibrant color without altering batter consistency, you could try natural alternatives like beet juice, but this may impact the taste slightly. The classic food coloring is preferred to get that signature hue in the Pink Velvet Roll Cake Recipe.
Can I make this cake ahead of time for a party?
Absolutely! This cake tastes even better after resting overnight in the fridge, making it a perfect make-ahead dessert. Just remember to wrap it tightly to keep it moist and fresh.
Is the almond extract necessary?
The almond extract is optional but adds a subtle bakery-quality flavor that many love. If you’re not a fan or have allergies, you can safely omit it without compromising the overall deliciousness of this Pink Velvet Roll Cake Recipe.
How do I avoid cracking when rolling the cake?
The key is rolling the cake right after baking while it’s still warm, using a powdered sugar-dusted kitchen towel to help shape it without sticking. Cooling the cake rolled up in the towel trains it to hold the shape and prevents cracks when filled.
Final Thoughts
I cannot recommend this Pink Velvet Roll Cake Recipe enough if you’re craving a dessert that feels both special and approachable. It’s a beautiful combination of tender cake and creamy filling that’s sure to brighten up any table and warm hearts all around. So grab your ingredients, have fun baking, and enjoy every delightful bite of this pink-hued, velvet-textured treasure!
Print
Pink Velvet Roll Cake Recipe
- Prep Time: 25 minutes
- Cook Time: 12 minutes
- Total Time: 1 hour 45 minutes
- Yield: 10 slices
- Category: Dessert
- Method: Baking
- Cuisine: American
- Diet: Vegetarian
Description
This Pink Velvet Roll Cake is a delightful American dessert featuring a soft, pink-hued sponge cake rolled with a creamy and smooth cream cheese filling. Perfect for Valentine’s Day or any special occasion, this cake combines the light texture of a jelly roll with the rich flavor of cream cheese frosting. The subtle almond extract adds a bakery-style touch, while a dusting of powdered sugar on the outer layer makes for an elegant finish.
Ingredients
Cake Ingredients
- 3/4 cup all-purpose flour
- 1/4 cup cornstarch
- 1 teaspoon baking powder
- 1/4 teaspoon salt
- 4 large eggs (room temperature)
- 3/4 cup granulated sugar
- 1/4 cup vegetable oil
- 1/4 cup buttermilk
- 1 teaspoon vanilla extract
- 1/4 teaspoon almond extract (optional)
- Pink gel food coloring (a few drops)
- Powdered sugar (for dusting and rolling)
Filling Ingredients
- 8 oz cream cheese (softened)
- 1/2 cup unsalted butter (softened)
- 1 1/2 cups powdered sugar
- 1 teaspoon vanilla extract
Instructions
- Preheat and Prepare: Preheat the oven to 350°F (175°C). Line a 10×15-inch jelly roll pan with parchment paper, leaving an overhang on the sides for easier cake removal.
- Mix Dry Ingredients: In a medium bowl, sift together the all-purpose flour, cornstarch, baking powder, and salt to ensure a smooth batter without lumps.
- Beat Eggs and Sugar: In a large mixing bowl, use an electric mixer to beat the eggs until they turn thick and pale, about 5 minutes. Gradually add the granulated sugar while continuing to beat to create a light and airy base.
- Add Wet Ingredients and Color: Incorporate the vegetable oil, buttermilk, vanilla extract, almond extract (if using), and a few drops of pink gel food coloring. Mix gently until combined and the batter is uniformly pink.
- Combine Batter: Gently fold the sifted dry ingredients into the wet mixture using a spatula. Mix carefully until the batter is smooth, being cautious not to deflate the eggs.
- Bake the Cake: Pour the batter evenly into the prepared jelly roll pan and smooth the surface. Bake for 10 to 12 minutes or until the cake springs back when lightly touched.
- Roll Cake While Warm: While baking, lay a clean kitchen towel on a flat surface and dust it generously with powdered sugar. Once the cake finishes baking, immediately invert it onto the sugared towel. Carefully peel off the parchment paper, then starting at the short end, roll the cake up with the towel inside. Allow it to cool completely in this rolled position.
- Prepare the Filling: In a mixing bowl, beat softened cream cheese and butter until smooth and creamy. Gradually add powdered sugar and vanilla extract and beat until the mixture is fluffy and spreadable.
- Fill and Re-roll Cake: Once the cake is completely cooled, gently unroll it and evenly spread the cream cheese filling over the surface. Re-roll the cake tightly without the towel, wrap it securely with plastic wrap, and refrigerate for at least 1 hour.
- Serve: After chilling, slice the Pink Velvet Roll Cake into approximately 10 slices and serve chilled for best flavor and texture.
Notes
- Adjust the amount of pink gel food coloring to achieve your desired intensity of pink color.
- The almond extract adds a delicate bakery-style flavor, but it can be omitted if preferred or substituted with other flavor extracts.
- Be sure to roll the cake while it is still warm to prevent cracking.
- Chilling the cake after filling helps the roll hold its shape and makes slicing neater.


