
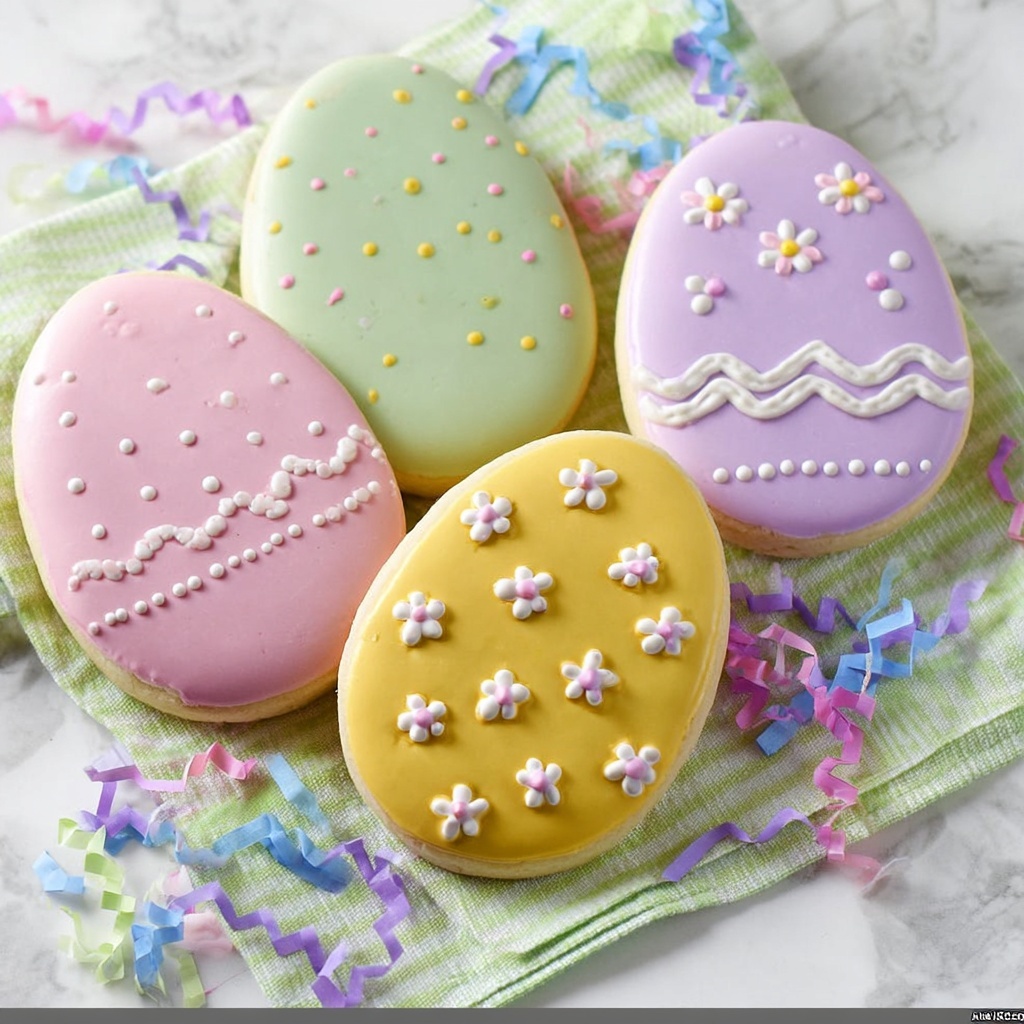
If you’re searching for a charming, festive treat that captures the sweet spirit of spring, these Easter Egg Sugar Cookies With Royal Icing Recipe are an absolute delight. Imagine tender, buttery sugar cookies shaped like Easter eggs, each carefully coated and decorated with smooth, brightly colored royal icing that dries to perfection. These cookies are not only a feast for the eyes but a joy to bake and share with loved ones. Whether for a celebration, a gift, or just a cozy afternoon snack, this recipe brings a burst of color and happiness to your kitchen.

Ingredients You’ll Need
Gathering the right ingredients is your first step to cookie success. The magic behind these Easter Egg Sugar Cookies With Royal Icing Recipe lies in simple, pantry-friendly staples that come together to create the perfect balance of flavor and texture. Each ingredient plays an essential role, whether it’s for the tender crumb of the cookie or the glossy finish of the icing.
- 1 cup softened unsalted butter: Gives cookies a rich, creamy base and tender texture.
- 1 cup sugar: Sweetness that caramelizes gently during baking for flavor and structure.
- 1 large egg: Acts as a binder and adds moisture to the dough.
- 1 tsp vanilla extract: Brings warm, fragrant notes that elevate the cookie’s flavor.
- 3 cups all-purpose flour: The foundation that shapes and supports the cookie.
- 1 tsp baking powder: Helps cookies rise slightly for a tender, light bite.
- 1/2 tsp salt: Balances sweetness and enhances all flavors.
- Additional flour for rolling: Prevents sticking and ensures smooth rolling.
- 8 cups powdered sugar: The key ingredient for crisp, sweet royal icing.
- 6 tbsp meringue powder: Creates that perfect glossy, firm icing texture.
- 2 tsp vanilla extract: Adds flavor to the icing for harmonious taste.
- 12 tbsp warm water: Activates meringue powder and helps achieve proper icing consistency.
- Gel food coloring in the desired color: Brings vibrant, customizable hues to your decorations.
How to Make Easter Egg Sugar Cookies With Royal Icing Recipe
Step 1: Cream the Butter and Sugar
Start by beating the softened unsalted butter for about three minutes until it’s luxuriously creamy. This step is crucial because it introduces air, which makes your cookies light. Then add sugar and vanilla, mixing until fully combined to infuse the dough with sweetness and aroma.
Step 2: Incorporate Egg and Dry Ingredients
Next, add the egg to the butter mixture and mix until just blended. Meanwhile, sift the flour with baking powder and salt in a separate bowl to evenly distribute the leavening and salt. Gradually add this dry mixture to your wet ingredients, mixing gently until the dough is smooth and cohesive.
Step 3: Chill the Dough
Form your dough into a ball, wrap it tightly in plastic wrap, then refrigerate it for at least two hours or overnight. This chilling step is essential as it makes the dough easier to handle and helps the cookies keep their beautiful shape during baking.
Step 4: Roll, Cut, and Bake
Once chilled, divide the dough in half and roll each portion between parchment paper until it’s about a quarter-inch thick. Use your egg-shaped cookie cutter to cut as many cookies as possible without re-rolling excessively, as repeated rolling may introduce air pockets that affect the final texture. Preheat your oven to 350°F, line your baking sheets with parchment or a silpat, and bake for 10 to 11 minutes until the edges just start to turn golden. Allow the cookies to rest on the sheet briefly before transferring them to a wire rack to cool completely.
Step 5: Prepare the Royal Icing
While your cookies cool, mix together the powdered sugar, meringue powder, vanilla, and warm water in a stand mixer. Beat this mixture for about eight minutes on medium speed until it thickens and gleams with a shiny finish. This glossy texture is what makes your cookies so irresistibly beautiful.
Step 6: Color and Decorate
Divide your royal icing and tint each portion with gel food coloring, adding a little at a time to get vibrant hues without altering the icing’s consistency. Thin the icing with water so it flows smoothly but isn’t too runny, achieving what’s called a 20-second consistency—meaning a drizzle takes about 20 seconds to disappear. Fill piping bags fitted with Wilton #2 tips and carefully decorate your cookies, starting with a smooth background layer. Let the icing set fully, at least eight hours, before adding detailed decorations or stacking for gifting.
How to Serve Easter Egg Sugar Cookies With Royal Icing Recipe
Garnishes
To elevate these cookies, consider adding delicate edible accents like shimmering sugar crystals, tiny edible pearls, or a dusting of colored sanding sugar. These touches add a bit of sparkle and texture, making each cookie a miniature work of art perfect for Easter tables or party favors.
Side Dishes
These cookies pair beautifully with light, fresh accompaniments. Serve them alongside a bright fruit salad, a refreshing cup of mint tea, or even a creamy vanilla latte. The subtle sweetness of the cookies balances perfectly with crisp or creamy sides, making the moment extra special.
Creative Ways to Present
Presentation can be half the fun! Arrange your Easter Egg Sugar Cookies With Royal Icing Recipe on a tiered cake stand surrounded by fresh spring flowers or place each cookie in a clear cellophane bag tied with pastel ribbon for charming party favors. You can also create a colorful cookie platter mixing different icing patterns and colors for a festive display that invites everyone to dig in and celebrate.
Make Ahead and Storage
Storing Leftovers
If you have cookies left over, keep them fresh by storing in an airtight container at room temperature. Properly stored, they remain delicious for up to 10 days. Make sure the icing has fully set before stacking the cookies to avoid smudging your beautiful decorations.
Freezing
You can freeze these cookies if you want to prepare for later. Place cooled cookies in a single layer on a baking sheet to flash freeze, then transfer them to an airtight freezer-safe container or bag with parchment paper between layers. When thawing, bring them to room temperature gently to keep the icing intact and fresh.
Reheating
Since these are sugar cookies with royal icing, reheating isn’t recommended as it may cause the icing to melt or crack. These cookies are best enjoyed at room temperature for a perfect bite every time.
FAQs
Can I use a different icing instead of royal icing?
While royal icing is preferred for its smooth finish and hard-drying texture, you can try a simple glaze or buttercream for a softer, creamier topping, but it won’t have the same crisp look or longevity.
How do I prevent royal icing from cracking?
Be sure to add the right amount of water to achieve a smooth, spreadable consistency, avoid over-thinning, and let the icing dry in a cool, dry place to prevent cracks and bubbles.
Can I make these cookies gluten-free?
Yes! Substitute the all-purpose flour with a gluten-free flour blend that includes xanthan gum for best results. The texture might differ slightly but will still be delicious.
Is meringue powder necessary for royal icing?
Meringue powder is key for stable, fluffy royal icing. If unavailable, fresh egg whites can be used, but meringue powder is safer especially for gifting or sharing, as it reduces risk of raw egg ingestion.
How long can I decorate the cookies in advance?
You can decorate your cookies fully and let them set for up to 2 days prior to serving, which makes them perfect for planning ahead for Easter celebrations or gifts.
Final Thoughts
There’s something truly joyous about baking and decorating Easter Egg Sugar Cookies With Royal Icing Recipe, whether sharing them with family or gifting them to friends. This recipe brings together tender, buttery cookies with the bright, artistic flair of royal icing, making it a fun and rewarding project. Grab your mixing bowl, bring out your favorite colors, and dive into this delightful spring tradition—you won’t regret adding these charming cookies to your holiday celebrations.
Print
Easter Egg Sugar Cookies With Royal Icing Recipe
- Prep Time: 30 minutes
- Cook Time: 11 minutes
- Total Time: 3 hours including chilling and icing drying time
- Yield: 20 servings (approximately 20-24 cookies depending on cutter size)
- Category: Dessert
- Method: Baking
- Cuisine: American
- Diet: Vegetarian
Description
Delightfully soft and buttery Easter Egg Sugar Cookies decorated with smooth, colorful royal icing. These charming cookies are perfect for festive celebrations, featuring a tender crumb and beautifully detailed icing made from meringue powder and powdered sugar. Ideal for kids and adults alike, they hold up well for days, making them a wonderful gift or party treat.
Ingredients
For the Cookies
- 1 cup softened unsalted butter
- 1 cup sugar
- 1 large egg
- 1 tsp vanilla extract
- 3 cups all-purpose flour
- 1 tsp baking powder
- 1/2 tsp salt
- Additional flour for rolling
For the Royal Icing
- 8 cups powdered sugar
- 6 tbsp meringue powder
- 2 tsp vanilla extract
- 12 tbsp warm water
- More water to thin the icing
- Gel food coloring in desired colors
Instructions
- Prepare the cookie dough: In the bowl of a stand mixer fitted with paddle attachment, beat softened butter for 3 minutes until creamy. Add sugar and vanilla, and beat until incorporated. Add the egg and mix until fully combined.
- Mix dry ingredients: In a large bowl, sift together flour, baking powder, and salt. Gradually add the dry mixture to the wet ingredients, mixing until the flour is fully incorporated into a dough.
- Chill the dough: Form the dough into a ball, wrap tightly with plastic wrap, and refrigerate for at least 2 hours or overnight to firm up.
- Roll and cut cookies: Remove dough from fridge, divide into two equal balls. Roll each ball between parchment paper to about 1/4 inch thickness. Using an egg-shaped cookie cutter, cut out the cookies. Re-roll scraps as necessary, but minimize re-rolling to keep cookies smooth.
- Bake the cookies: Preheat oven to 350°F (175°C). Place cut-outs on a baking sheet lined with silicone mat or parchment paper. Bake for 10-11 minutes until just beginning to turn golden at the edges. Let cool on the baking sheet 10 minutes, then transfer to a wire rack and cool completely.
- Make the royal icing: In a clean bowl of the stand mixer with paddle attachment, combine powdered sugar, meringue powder, vanilla, and 12 tablespoons warm water. Beat on medium speed for about 8 minutes until the icing becomes thick, shiny, and holds peaks.
- Color and thin the icing: Divide icing into portions and add gel food coloring a little at a time until desired colors are achieved. Thin icing with a small amount of water to reach a 20-second consistency for flooding cookies.
- Decorate the cookies: Fill piping bags fitted with Wilton #2 tips with the colored icing. Outline and fill the cookies with the base color and let the icing set for at least 8 hours. Add additional decorative details as desired and allow the icing to fully dry.
- Store the cookies: Keep decorated cookies in an airtight container at room temperature for up to 10 days, or individually package each cookie to maintain freshness and designs.
Notes
- For best results, chill the dough overnight to improve flavor and ease of handling.
- Use gel or paste food coloring to avoid thinning the royal icing too much.
- Allow royal icing to fully dry and set for at least 8 hours before stacking or packaging cookies.
- If icing thickens too much while decorating, adjust consistency with small amounts of water.
- Store cookies in an airtight container to keep them fresh and crisp.


