
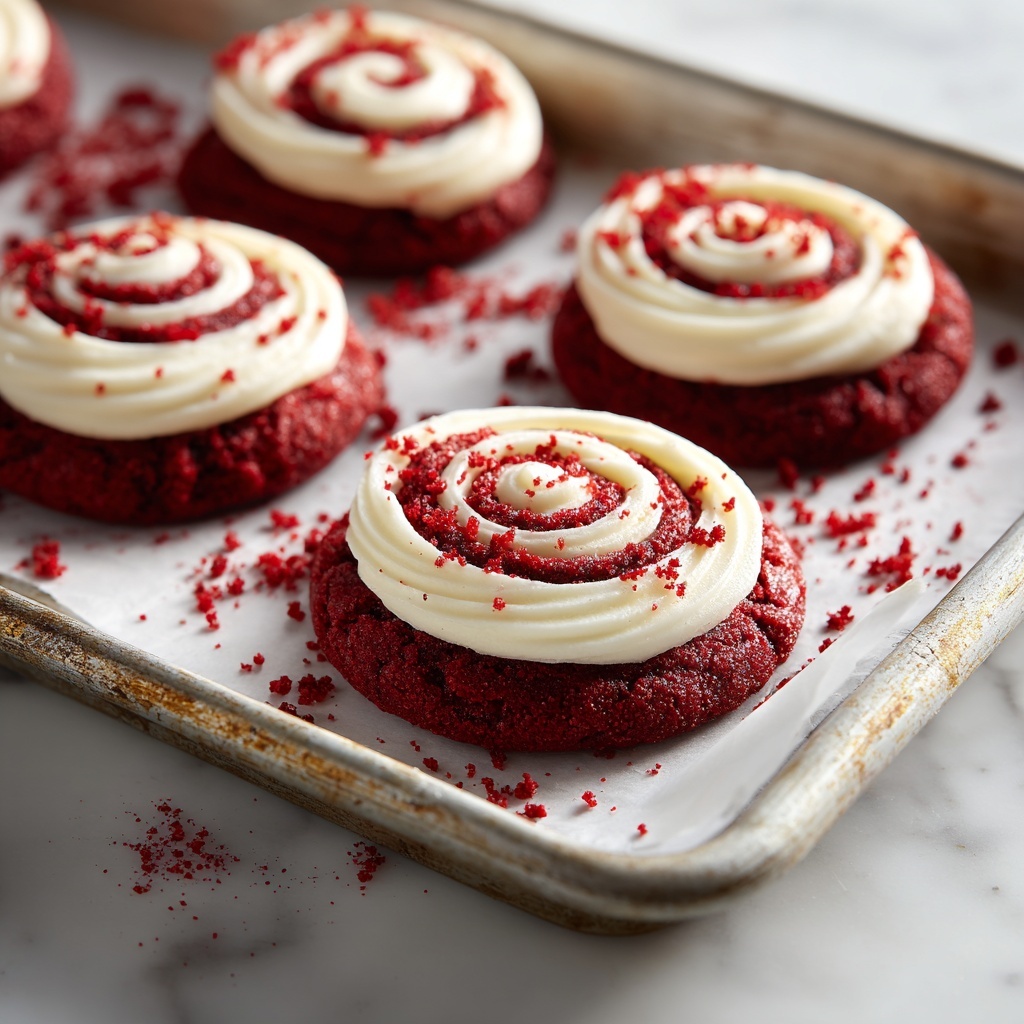
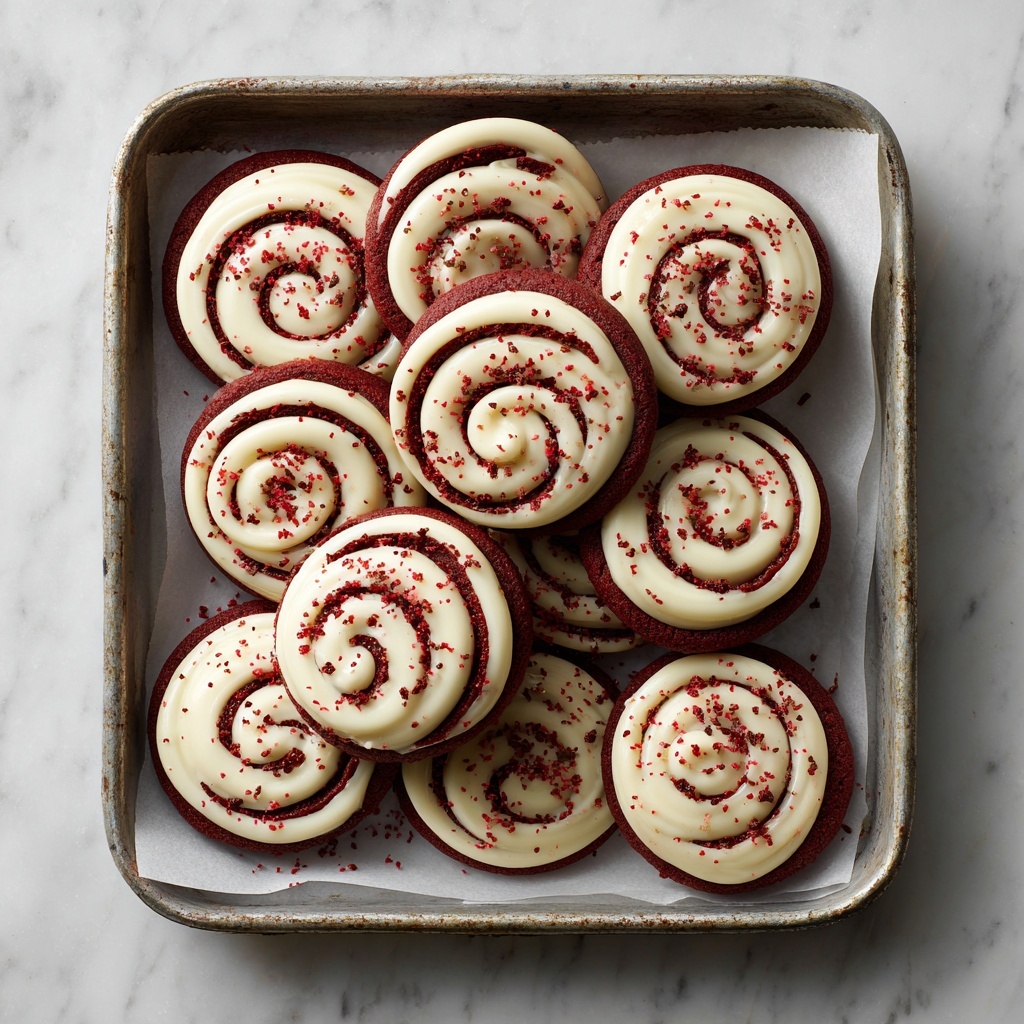
If you are looking for a delightful treat that combines the classic charm of red velvet with a luscious, creamy surprise inside, this Red Velvet Cookie Cups with Cream Cheese Filling Recipe is an absolute must-try. These cookie cups are like little bites of heaven—soft, tender red velvet cookie dough wrapped around a rich cream cheese filling that oozes a touch of tangy sweetness with every bite. Perfect for sharing or indulging on your own, this recipe brings together incredible texture, vibrant color, and rich flavor in a way that will have you coming back for more.
Ingredients You’ll Need
What’s amazing about the ingredients for this recipe is how simple they are, yet each component plays a crucial role in creating those soft, velvety cookie cups packed with creamy goodness. From the richness of butter to the perfect hint of cocoa and the zing of vinegar, every ingredient is essential for a flawless balance of flavor, texture, and color that makes these cookie cups so special.
- Unsalted butter (½ cup): Softened butter provides the richness and moisture that keeps your cookies tender and scrumptious.
- Granulated sugar (½ cup): Adds sweetness and helps create that delightful crumbly texture.
- Brown sugar (½ cup, packed): Brings depth of flavor and chewiness thanks to its molasses content.
- Large egg (1): Acts as a binder to hold everything together and contributes to the cookie’s softness.
- Vanilla extract (1 teaspoon + ½ teaspoon): Adds a warm, aromatic base making every bite more flavorful, used both in dough and filling.
- Red food coloring (1 tablespoon): Gives these cookies their signature rich, red hue that’s so inviting and festive.
- White vinegar (1 teaspoon): Reacts with baking soda to create lift and subtly enhances the tangy red velvet flavor.
- All-purpose flour (1 ¼ cups): The backbone of the cookie, providing structure without weighing it down.
- Unsweetened cocoa powder (¼ cup): Adds that classic red velvet chocolate note without overpowering the cream cheese center.
- Baking soda (½ teaspoon): Leavens the dough and gives those lovely cracks on top.
- Salt (¼ teaspoon): Balances sweetness and intensifies the other flavors.
- Cream cheese (4 ounces, softened): Creates the luscious, creamy filling that complements the cookies perfectly.
- Powdered sugar (¼ cup): Sweetens the cream cheese filling while keeping it silky smooth.
How to Make Red Velvet Cookie Cups with Cream Cheese Filling Recipe
Step 1: Preheat Your Oven
Start by heating your oven to 350°F (175°C) and prepare a baking sheet by lining it with parchment paper. This simple step ensures your cookie cups bake evenly, and the parchment prevents sticking, making cleanup a breeze.
Step 2: Cream the Butter and Sugars
In a mixing bowl, beat the softened butter with granulated and brown sugars until the mixture becomes light and fluffy. This whipping step is key to giving your cookies their melt-in-your-mouth texture, as it incorporates air and blends the sugars thoroughly.
Step 3: Add Wet Ingredients
Next, mix in the egg, vanilla extract, red food coloring, and white vinegar until everything is well combined. The vinegar reacts subtly with the baking soda later and accentuates the classic red velvet tang, while the food coloring makes these cookies unmistakably vibrant and inviting.
Step 4: Combine Dry Ingredients
In a separate bowl, whisk together the all-purpose flour, cocoa powder, baking soda, and salt. Gradually incorporate this dry mix into your wet mixture to form a soft dough. Be careful not to overmix here—just combine until the flour disappears for tender cookie cups.
Step 5: Prepare the Cream Cheese Filling
In a small bowl, beat the softened cream cheese with powdered sugar and vanilla extract until smooth and creamy. This mixture will be the luscious filling that makes these cookie cups unforgettable, with its perfect balance of sweetness and tang.
Step 6: Assemble the Cookie Cups
Scoop out 1 tablespoon of cookie dough and flatten it slightly in your palm. Place about ½ teaspoon of the cream cheese filling in the center, then cover it with another tablespoon of dough. Seal the edges carefully and roll gently into a ball. Repeat for the remaining dough and filling to create your cookie cups.
Step 7: Bake the Cookie Cups
Place the filled dough balls on your prepared baking sheet, spacing each about 2 inches apart. Bake for 10 to 12 minutes, until the cookies are set and start to crack on the tops. The slight cracks tell you they are perfectly baked while still soft inside.
Step 8: Cool Before Enjoying
Let the cookies rest on the baking sheet for 5 minutes after baking, then transfer them to a wire rack to cool completely. This cooling step lets the cookies firm up without losing any of their tender texture or the creamy filling’s delightful contrast.
How to Serve Red Velvet Cookie Cups with Cream Cheese Filling Recipe
Garnishes
Adding garnishes to your Red Velvet Cookie Cups with Cream Cheese Filling Recipe can elevate their look and flavor wonderfully. You might try a light dusting of powdered sugar, a drizzle of melted white chocolate, or a few festive sprinkles on top. These simple touches add visual appeal and a little extra sweetness that’s perfect for celebrations or gifting.
Side Dishes
These cookie cups are a star all on their own, but if you’re serving them at a party or dessert table, consider pairing them with a scoop of vanilla bean ice cream or a cup of rich hot cocoa. The creamy or warm elements contrast the cookie’s chewy texture and make for an indulgent experience that everyone will love.
Creative Ways to Present
Get creative by arranging these cookie cups in a pretty box with parchment inside for a gorgeous gift or display them stacked on a dessert stand to show off their beautiful red color and cream cheese centers. You can also serve them alongside fresh berries or mint leaves for a pop of freshness and color.
Make Ahead and Storage
Storing Leftovers
If you have any leftovers, store your Red Velvet Cookie Cups with Cream Cheese Filling Recipe in an airtight container at room temperature for up to 3 days. Keeping them airtight ensures they stay soft and the cream cheese filling remains smooth and delicious.
Freezing
You can freeze these cookie cups for longer storage by arranging them in a single layer on a baking sheet and freezing until firm, then transferring them to a freezer-safe container or bag. They’ll keep well for up to 3 months and make a perfect ready-made treat to thaw as needed.
Reheating
When you’re ready to enjoy frozen cookie cups, let them thaw at room temperature for about 20 minutes. For that fresh-baked warmth, heat them for 10-15 seconds in the microwave—just enough to soften but not melt the cream cheese filling inside.
FAQs
Can I use store-bought red velvet cake mix instead of the ingredients listed?
While cake mix can simplify the process, this particular recipe relies on balancing cocoa, vinegar, and the right amount of sugar and flour to get its signature texture and tang. For best results, follow the recipe ingredients to get those perfect cookie cups.
What if I don’t have red food coloring?
Red food coloring is crucial to achieve the iconic red velvet color. Without it, your cookies may look more like chocolate cookies. If you prefer natural alternatives, beet juice or powder can work, but keep in mind they might alter the taste slightly.
Can I make these cookie cups dairy-free?
You can substitute butter and cream cheese with dairy-free alternatives, but results may vary. Use a high-quality vegan cream cheese and plant-based butter to maintain the flavors and moisture that make these cookie cups so delightful.
How do I prevent the cream cheese filling from leaking out during baking?
Sealing the dough around the filling tightly is key. Try to smooth all edges over the filling and pinch firmly before rolling the ball. If the filling leaks, it might be because the dough had thin spots or wasn’t sealed completely.
Can I make smaller or larger cookie cups?
Absolutely! Just adjust baking time accordingly—smaller cookie cups may only need 8-10 minutes, while larger ones could take 12-15 minutes. Keep an eye on them to avoid overbaking, since size affects how heat reaches the center.
Final Thoughts
I can’t encourage you enough to try this Red Velvet Cookie Cups with Cream Cheese Filling Recipe because it’s an utterly charming twist on classic red velvet that’s easy to make and absolutely irresistible. Whether you’re baking for a special occasion or just craving something sweet, these cookie cups are guaranteed to bring joy with every bite. So grab your ingredients and enjoy the magic of this mouthwatering treat!
Print
Red Velvet Cookie Cups with Cream Cheese Filling Recipe
- Prep Time: 15 minutes
- Cook Time: 12 minutes
- Total Time: 32 minutes
- Yield: 16 servings
- Category: Dessert
- Method: Baking
- Cuisine: American
- Diet: Vegetarian
Description
Delight in these soft and moist Red Velvet Cupcake Cookies, filled with a luscious cream cheese center. Perfectly balanced with a hint of cocoa and classic red velvet flavor, these cookies bring the taste of cupcakes with the portability and crispness of cookies. Ideal for parties, holidays, or an everyday sweet treat.
Ingredients
Cookie Dough
- ½ cup unsalted butter, softened
- ½ cup granulated sugar
- ½ cup brown sugar, packed
- 1 large egg
- 1 teaspoon vanilla extract
- 1 tablespoon red food coloring
- 1 teaspoon white vinegar
- 1 ¼ cups all-purpose flour
- ¼ cup unsweetened cocoa powder
- ½ teaspoon baking soda
- ¼ teaspoon salt
Cream Cheese Filling
- 4 ounces cream cheese, softened
- ¼ cup powdered sugar
- ½ teaspoon vanilla extract
Instructions
- Preheat Oven: Preheat your oven to 350°F (175°C) and line a baking sheet with parchment paper to ensure the cookies bake evenly and don’t stick.
- Make Cookie Dough: Cream together the softened butter, granulated sugar, and brown sugar until the mixture is light and fluffy. Then, beat in the egg, vanilla extract, red food coloring, and white vinegar until well combined, ensuring a smooth, vibrant dough.
- Combine Dry Ingredients: In a separate bowl, whisk together the all-purpose flour, unsweetened cocoa powder, baking soda, and salt. Gradually add these dry ingredients to the wet mixture, mixing until just combined to avoid overworking the dough.
- Prepare Cream Cheese Filling: In a small bowl, beat softened cream cheese with powdered sugar and vanilla extract until smooth and creamy. This filling will add a delicious, tangy center to the cookies.
- Assemble Cookies: Scoop 1 tablespoon of dough and flatten it slightly. Place about ½ teaspoon of the cream cheese filling in the center, then cover with another tablespoon of dough. Seal the edges carefully and roll the cookie into a ball shape. Repeat with all remaining dough and cream cheese filling.
- Bake: Place the assembled cookies onto the prepared baking sheet, spacing them about 2 inches apart for proper spreading. Bake for 10-12 minutes until the cookies are set and slightly cracked on top, indicating a perfect balance of soft and chewy texture.
- Cool and Serve: Allow the cookies to cool on the baking sheet for 5 minutes to firm up before transferring them to a wire rack to cool completely. This helps set the cupcakes cookies with the creamy filling inside.
Notes
- Use room temperature ingredients for better mixing and texture.
- Make sure to seal the edges well to prevent the cream cheese filling from leaking during baking.
- Red food coloring can be adjusted depending on desired vibrancy.
- Store cookies in an airtight container to keep them soft for up to 3 days.
- Can be frozen after baking for up to 1 month; thaw at room temperature before serving.


