If you are looking for a delightful treat that perfectly balances creamy richness and buttery crunch, this Mini Cheesecake Tarts Recipe is your new best friend. These bite-sized delights combine a tender, smooth cheesecake filling nestled inside crisp mini tart shells, making them irresistibly charming and easy to enjoy. Whether you’re planning for a party, a festive holiday gathering, or simply want to brighten your dessert platter with a personal touch, these tarts are wonderfully customizable and straightforward to bake. Plus, their petite size makes every bite feel like a special indulgence that’s impossible to resist.
Ingredients You’ll Need
The beauty of this Mini Cheesecake Tarts Recipe lies in its simplicity and the quality of ingredients. Each component plays a vital role in creating that perfect balance of texture and flavor, from the creamy filling to the crunchy crust.
- 12 mini tart shells: You can use store-bought for convenience or homemade for a personal touch, each providing a buttery base.
- 8 oz cream cheese (softened): The star of the filling, delivering that classic cheesecake creaminess and tang.
- 1/4 cup granulated sugar: Adds just the right amount of sweetness to complement the tanginess of the cream cheese.
- 1 teaspoon vanilla extract: Enhances the flavor with a warm, aromatic note.
- 1 large egg: Helps bind the filling and create a smooth, rich texture.
- 1 tablespoon sour cream: Adds moisture and a subtle tang, keeping the filling luscious and soft.
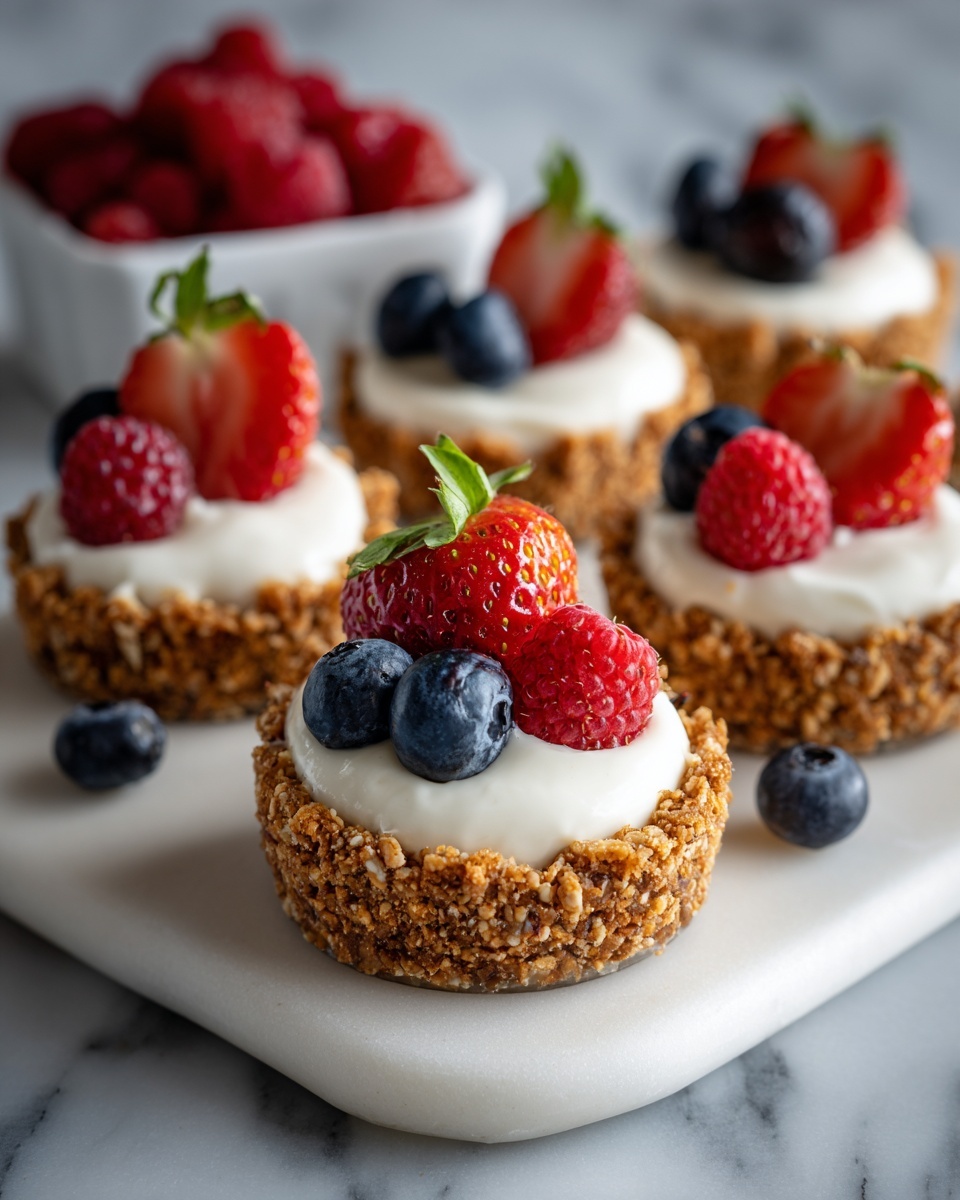
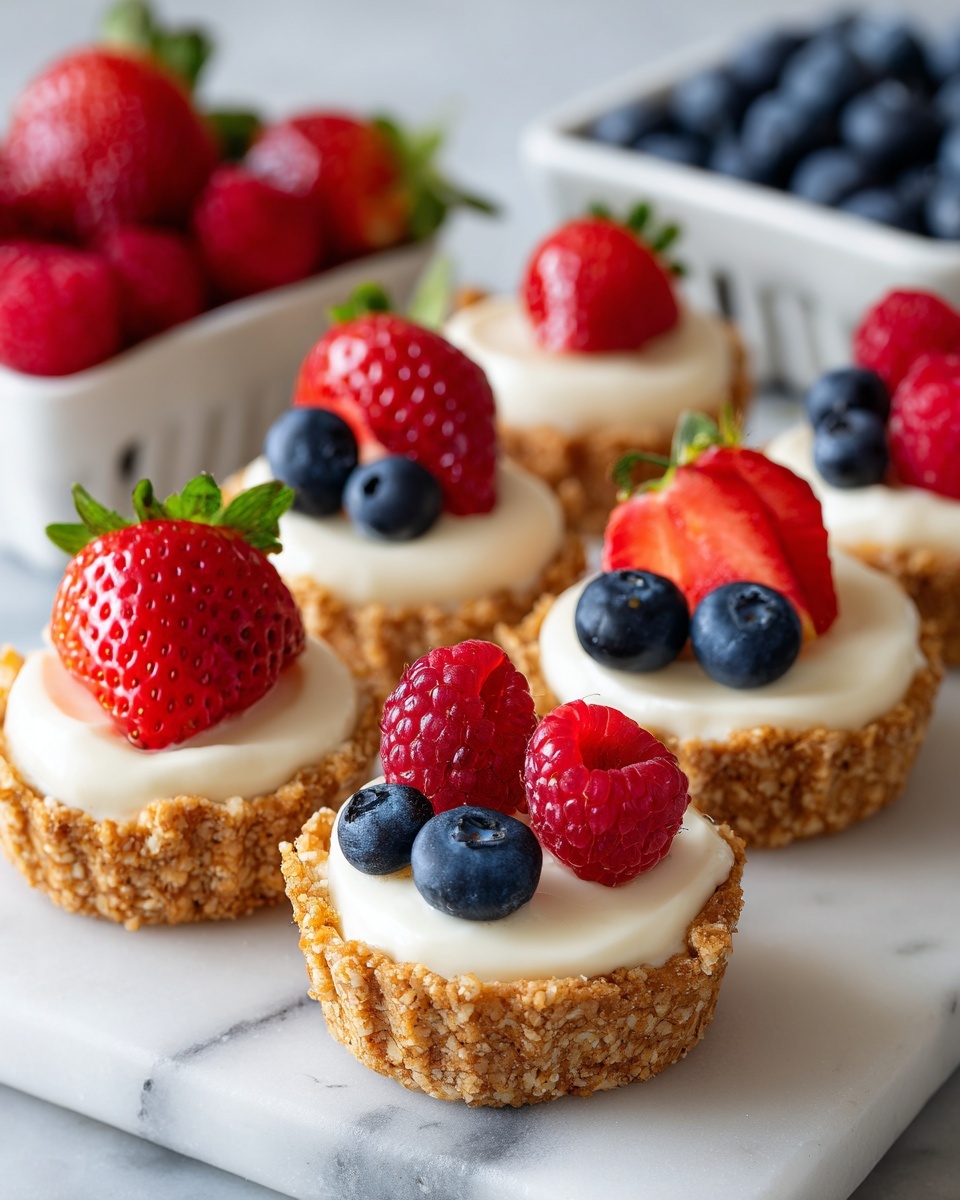
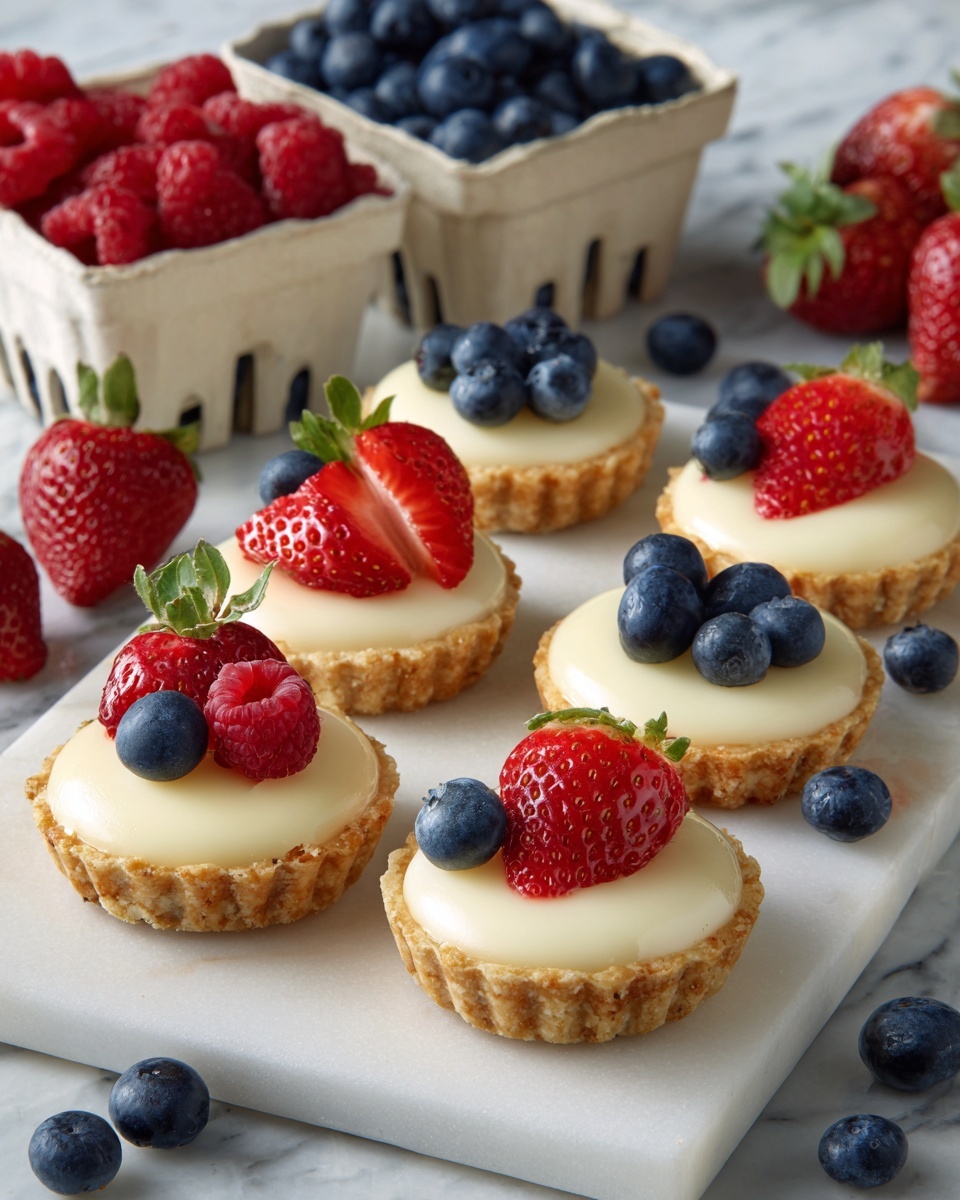
- Optional toppings (fruit preserves, fresh berries, chocolate sauce, or whipped cream): These give you endless ways to personalize and beautify each tart.
How to Make Mini Cheesecake Tarts Recipe
Step 1: Prepare Your Oven and Tart Shells
Start by preheating your oven to 325°F (163°C). If you’re using store-bought tart shells, arrange them neatly on a baking sheet to be ready for filling. This setup ensures even baking and makes it easier to transfer them in and out of the oven.
Step 2: Mix the Cream Cheese Filling
In a mixing bowl, beat the softened cream cheese until it becomes smooth and creamy without lumps. Next, sprinkle in the sugar and vanilla extract, mixing well to blend all the flavors. The goal here is to create a silky base that will set to a delicate, melt-in-your-mouth texture.
Step 3: Add the Egg and Sour Cream
Beat in the egg until it’s fully incorporated, which helps the filling hold together during baking. Finally, mix in the sour cream to add moisture and a hint of tanginess that keeps the cheesecake filling light and tender.
Step 4: Fill the Tart Shells
With a spoon, carefully fill each tart shell about three-quarters full with the cheesecake mixture. This leaves room for the filling to rise slightly without spilling over, ensuring a neat, attractive finish.
Step 5: Bake the Mini Cheesecake Tarts
Bake the filled shells for 15 to 18 minutes. You’ll know they’re done when the centers are just set but gently jiggle when you shake the pan slightly. Overbaking can lead to cracks or a dry texture, so keep a close eye during the final minutes.
Step 6: Cool and Chill
Let your tarts cool to room temperature before placing them in the refrigerator for at least one hour. Chilling is essential as it allows the cheesecake filling to firm up to that perfect sliceable consistency, making them ideal for serving.
How to Serve Mini Cheesecake Tarts Recipe
Garnishes
Once chilled, the real fun begins by decorating your little masterpieces. A spoonful of fruit preserves like raspberry or apricot adds a vibrant burst of color and fruity sweetness. Fresh berries provide a tart, juicy contrast while drizzles of chocolate sauce or a light dollop of whipped cream bring extra decadence. These garnishes not only elevate the look but also enhance the flavor experience with each bite.
Side Dishes
Though these Mini Cheesecake Tarts are delicious on their own, pairing them with a cup of freshly brewed coffee or a glass of sparkling wine turns your dessert into an elegant treat. For a brunch or tea party, serve alongside buttery scones or light fruit salads to balance richness with refreshing brightness.
Creative Ways to Present
Serve your mini tarts on a tiered cake stand for a stunning centerpiece or arrange them on a decorative platter sprinkled with edible flower petals for a charming, rustic feel. You can even pop individual tarts into pretty cupcake liners or small paper doilies to make them look extra special and easy for guests to pick up.
Make Ahead and Storage
Storing Leftovers
These mini cheesecake tarts keep beautifully in an airtight container in the refrigerator for up to two days. Proper storage ensures they maintain their creamy texture and buttery crust without becoming soggy or dry, so you can enjoy your delicious creations later without any compromise.
Freezing
If you want to prepare them further in advance, these tarts freeze well. Simply place them in a freezer-safe container, separated by parchment paper to avoid sticking. When ready to enjoy, thaw them overnight in the refrigerator to preserve the perfect texture.
Reheating
These tarts are best enjoyed chilled and typically don’t require reheating. If you prefer a slightly warmer tart, let them sit at room temperature for about 10-15 minutes before serving. Avoid microwaving, which can affect the texture and cause the filling to become grainy.
FAQs
Can I make the tart shells from scratch?
Absolutely! Homemade tart shells add a lovely personal touch and allow you to customize flavors, such as using graham cracker crumbs or shortbread dough. Just keep in mind they might require blind baking for the best results before adding your filling.
What other flavor variations can I try with this Mini Cheesecake Tarts Recipe?
You can mix things up by adding lemon zest or almond extract to the filling for a unique twist. Toppings like caramel sauce, toasted nuts, or coconut flakes also provide fun variations that keep this recipe fresh and exciting.
Are these tarts suitable for parties?
Definitely! Their small size makes them perfect finger foods, and the presentation possibilities make them a show-stopper at any gathering. They’re easy to transport and serve, which is a huge plus for entertaining.
Can I use a dairy-free cream cheese alternative?
Yes, vegan cream cheese works well in this recipe. Just ensure it is softened and blended thoroughly to maintain the creamy texture. You might notice slight differences in flavor and firmness, but it’s a great option for dairy-free diets.
How do I know when the tarts are done baking?
The filling should look set around the edges while still slightly jiggly in the center when you gently shake the pan. This ensures a creamy, smooth texture rather than a dry or cracked cheesecake.
Final Thoughts
This Mini Cheesecake Tarts Recipe holds a special place in my heart, and I hope it becomes a favorite in your kitchen too. Its combination of simplicity, elegance, and irresistible flavor makes it perfect for any occasion or just a sweet treat to brighten your day. Give these adorable, creamy tarts a try—you might find they disappear faster than you expect!
Print
Mini Cheesecake Tarts Recipe
- Prep Time: 15 minutes
- Cook Time: 18 minutes
- Total Time: 33 minutes plus at least 1 hour chilling
- Yield: 12 mini tarts
- Category: Dessert
- Method: Baking
- Cuisine: American
- Diet: Vegetarian
Description
Mini cheesecake tarts are creamy, bite-sized treats featuring a buttery crust and smooth, flavorful cheesecake filling. These delightful desserts are easy to prepare and perfect for serving at parties, holidays, or any special occasion. Customize each tart with toppings like fresh fruit, chocolate, or preserves to suit your taste and create endless delightful variations.
Ingredients
Crust
- 12 mini tart shells (store-bought or homemade)
Filling
- 8 oz cream cheese (softened)
- 1/4 cup granulated sugar
- 1 teaspoon vanilla extract
- 1 large egg
- 1 tablespoon sour cream
Toppings (optional)
- Fruit preserves
- Fresh berries
- Chocolate sauce
- Whipped cream
Instructions
- Preheat Oven: Preheat your oven to 325°F (163°C). Arrange the mini tart shells on a baking sheet if using store-bought shells.
- Prepare Filling: In a mixing bowl, beat the softened cream cheese until smooth to ensure a creamy texture. Add granulated sugar and vanilla extract, mixing well to combine evenly.
- Add Egg and Sour Cream: Beat in the large egg fully into the mixture until smooth and uniform, then gently fold in the sour cream to add richness and moisture.
- Fill Tart Shells: Spoon the cheesecake filling evenly into each tart shell, filling them about three-quarters full to allow room for slight rising during baking.
- Bake: Place the filled tart shells in the oven and bake for 15 to 18 minutes. The centers should be just set and may be slightly jiggly when done, indicating perfect texture.
- Cool and Chill: Remove the tarts from the oven and allow them to cool to room temperature. After cooling, refrigerate for at least 1 hour to firm up the filling and enhance flavors.
- Add Toppings and Serve: Before serving, top the mini cheesecakes with your choice of fruit preserves, fresh berries, chocolate sauce, or whipped cream for added flavor and presentation.
Notes
- Use mini graham cracker or shortbread crusts for a simple, delicious base.
- These cheesecakes can be made up to 2 days in advance and stored covered in the refrigerator.
- Add lemon zest or almond extract to the filling mixture for a refreshing flavor twist.


