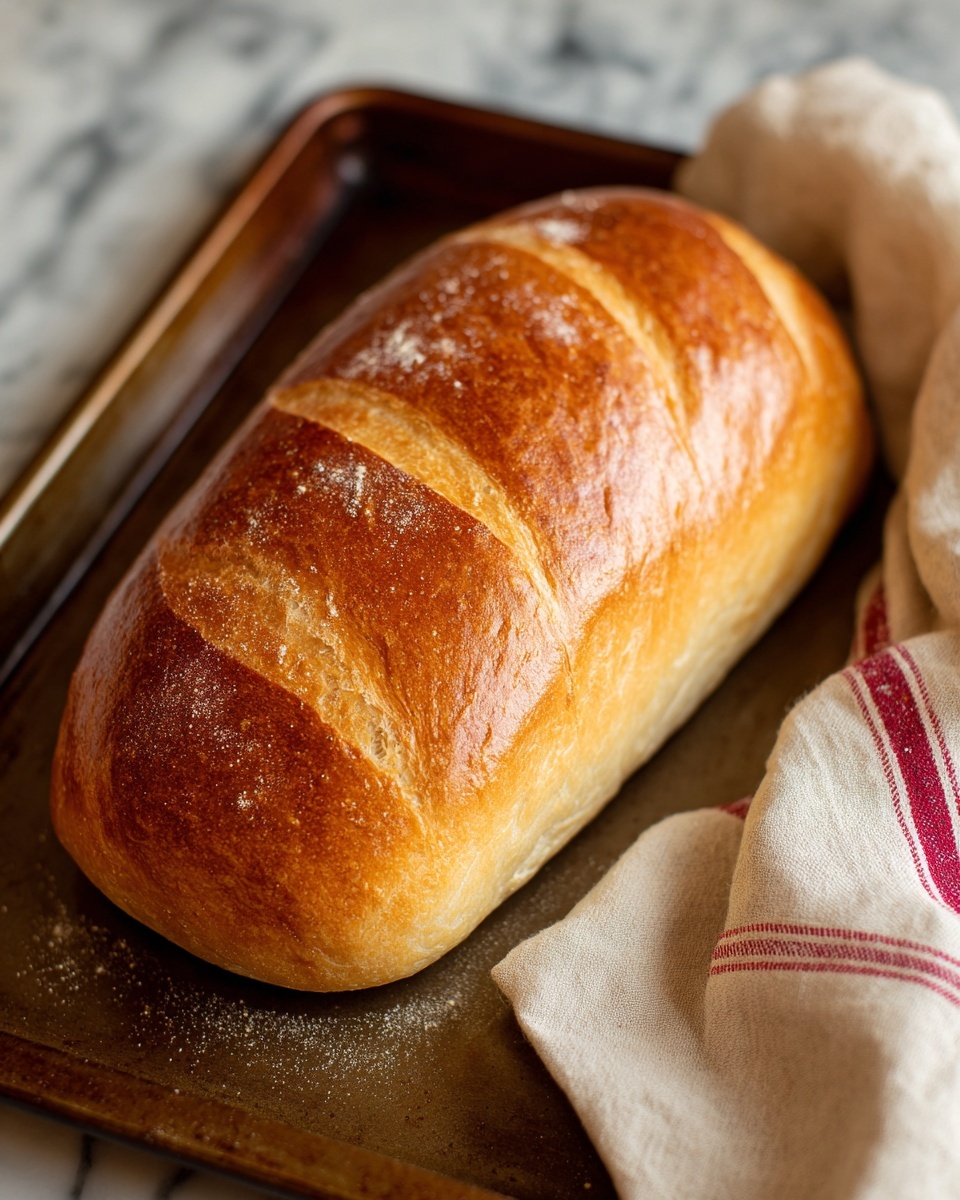
If there’s one classic that never goes out of style, it’s this Italian Bread Recipe—a heavenly, crusty loaf with a tender crumb that brings a little taste of Italy right into your kitchen. Whether you want to elevate your sandwiches, scoop up sauces, or simply enjoy fresh bread warm from the oven, this recipe is the perfect combination of simple ingredients and heartfelt technique. I love how it transforms everyday pantry staples into something magical, with that golden crust and chewy interior everyone raves about. Trust me, once you try this Italian Bread Recipe, it might just become your go-to comfort food staple!
Ingredients You’ll Need
The beauty of this Italian Bread Recipe lies in its straightforward ingredients list—each one paying a crucial role in building the perfect loaf. From flour providing the structure to olive oil adding moisture and flavor, every component works harmoniously to create that iconic Italian bread experience.
- 3 1/2 cups all-purpose flour: Provides the foundation for a sturdy yet soft dough.
- 1 tablespoon sugar: Feeds the yeast to help your bread rise beautifully.
- 2 teaspoons salt: Enhances flavor and controls yeast activity to create balance.
- 1 tablespoon active dry yeast: The magic that gives your bread lift and airy texture.
- 1 1/2 cups warm water (110°F/45°C): Activates the yeast without killing it and hydrates the dough.
- 1 tablespoon olive oil: Adds richness and helps keep the crumb moist and tender.
- 1 tablespoon cornmeal (for dusting): Prevents sticking and adds a lovely rustic finish to the crust.
How to Make Italian Bread Recipe
Step 1: Activate the Yeast
Start by dissolving the sugar and yeast in warm water. This small but mighty step wakes up the yeast, getting it foamy and ready to do its job of making your dough rise. Patience here is key—let it sit for 5 to 10 minutes until you see that wonderful foamy layer on top.
Step 2: Mix the Dough
In a large bowl, whisk together the flour and salt to evenly distribute that salty goodness. Pour in the yeast mixture along with the olive oil, then stir until everything comes together into a shaggy dough. This is where your bread starts to reveal its character!
Step 3: Knead to Perfection
Turn your dough out onto a floured surface and get ready to work those hands. Knead for about 8 to 10 minutes until it becomes smooth and elastic. Proper kneading develops the gluten structure, which means your bread will be chewy and springy—exactly what you want from an authentic Italian loaf.
Step 4: First Rise
Place your dough in a greased bowl, cover it with a damp cloth, and let it rest in a warm spot. This is where all the magic happens as the yeast molecules feast and multiply, causing your dough to double in size in about 1 to 2 hours. The rising dough is a sure sign your bread will be light and airy.
Step 5: Prepare for Baking
Preheat your oven to 375°F (190°C)—you want it nice and hot to ensure a crispy crust. Punch down the dough to release any large air bubbles, then shape it into a classic loaf. Dust a baking sheet generously with cornmeal to prevent sticking and transfer your dough onto it.
Step 6: Second Rise and Scoring
Let the shaped dough rise again for 30 minutes—this final rest makes the texture tender yet slightly chewy. Before baking, use a sharp knife to slash the top of your loaf. These cuts aren’t just decorative; they help the bread expand evenly while baking, giving that signature rustic look.
Step 7: Bake to Golden Perfection
Bake for 25 to 30 minutes, or until the crust turns a beautiful golden brown and the loaf sounds hollow when tapped underneath—this is a classic test indicating it’s perfectly baked through. Once out of the oven, cool the bread on a wire rack to maintain its crisp crust before slicing.
How to Serve Italian Bread Recipe
Garnishes
Simple toppings like a drizzle of high-quality olive oil, a sprinkle of sea salt, or fresh herbs make the Italian bread come alive. For a little extra flair, try rubbing the toasted slices with a garlic clove—subtle, aromatic, and utterly delicious.
Side Dishes
This bread pairs beautifully with so many Italian classics—from hearty tomato sauces and vibrant bruschettas to a creamy bowl of pasta or a flavorful antipasto platter. It also shines with soups or stews, perfect for soaking up every last bit of your meal.
Creative Ways to Present
Turn your loaf into a festive centerpiece by slicing it into thick slabs, topping them with fresh mozzarella and basil for instant bruschetta, or hollowing it out to serve as an edible bread bowl for dips. Presentation makes everything feel just a bit more special, and this bread provides the perfect canvas.
Make Ahead and Storage
Storing Leftovers
Wrap leftover bread tightly in plastic wrap or store in an airtight container to retain moisture and freshness. It’s best enjoyed within a day or two to savor the crust’s crispness and the tender crumb.
Freezing
If you want to keep your Italian Bread Recipe fresh for longer, freezing is your friend. Slice the bread, place parchment paper between slices to prevent sticking, then seal tightly in a freezer bag. When you’re ready to enjoy, thaw at room temperature or toast slices straight from the freezer.
Reheating
To revive the texture and warmth, reheat the bread in a preheated oven at 350°F (175°C) for 5 to 10 minutes. This brings back the crunchy crust and fluffy interior, making every bite feel just baked.
FAQs
Can I use whole wheat flour instead of all-purpose flour?
Absolutely! Substituting whole wheat flour will give your Italian Bread Recipe a nuttier flavor and denser texture. For best results, try a 50/50 mix to maintain a light crumb while boosting nutrition.
How important is the water temperature for the yeast?
Very important! Water that is too hot can kill the yeast, while water that is too cold won’t activate it properly. Aim for around 110°F (45°C), which is warm enough to wake the yeast without harming it.
Can I make this bread without olive oil?
While olive oil adds lovely richness and tenderness, you can omit it if needed. The bread will still rise and bake well, but it might be a little less soft inside and less flavorful.
Why do I need to slash the dough before baking?
Slashing allows the bread to expand during baking without cracking unpredictably. It controls where the loaf opens up, giving it that classic artisan look and preventing uneven texture.
How do I know when the bread is fully baked?
The best test is tapping the bottom of the loaf—it should sound hollow when fully baked. A golden-brown crust and an internal temperature of about 190°F (88°C) also mean your bread is ready to enjoy.
Final Thoughts
This Italian Bread Recipe has a special place in my heart because of how it effortlessly combines simple ingredients into such a delicious, comforting loaf. Whether you’re a baking novice or a seasoned bread maker, this recipe is a rewarding project that fills your home with warmth and comforting aromas. I can’t wait for you to try it—there’s something truly magical about breaking into a fresh homemade loaf that’s just waiting to be enjoyed with family and friends.
Print
Italian Bread Recipe
- Prep Time: 30 minutes
- Cook Time: 30 minutes
- Total Time: 1 hour 45 minutes
- Yield: 12 servings
- Category: Bread
- Method: Baking
- Cuisine: Italian
Description
This classic Italian Bread recipe delivers a crusty, golden loaf with a soft and chewy interior. Made from simple ingredients like flour, yeast, and olive oil, it’s ideal for sandwiches, dipping in olive oil, or serving alongside your favorite Italian dishes. The dough is kneaded by hand, allowed to rise twice, and then baked in the oven to achieve the perfect texture and flavor.
Ingredients
Dough Ingredients
- 3 1/2 cups all-purpose flour
- 1 tablespoon sugar
- 2 teaspoons salt
- 1 tablespoon active dry yeast
- 1 1/2 cups warm water (110°F/45°C)
- 1 tablespoon olive oil
For Baking
- 1 tablespoon cornmeal (for dusting)
Instructions
- Activate Yeast: In a small bowl, dissolve the sugar and active dry yeast in warm water (110°F/45°C). Let the mixture sit for 5–10 minutes until it becomes foamy, indicating the yeast is active.
- Mix Dough: In a large bowl, combine all-purpose flour and salt. Pour in the foamy yeast mixture and olive oil. Stir until a rough dough begins to form.
- Knead Dough: Turn the dough out onto a floured surface and knead for 8–10 minutes until the dough is smooth, elastic, and no longer sticky.
- First Rise: Place the kneaded dough into a greased bowl. Cover it with a damp cloth and let it rise in a warm area for 1–2 hours, or until it has doubled in size.
- Preheat Oven: Preheat your oven to 375°F (190°C) to prepare for baking.
- Shape Loaf: Punch down the risen dough to release the air. Shape it into a loaf and place it on a baking sheet dusted with cornmeal to prevent sticking.
- Second Rise: Allow the shaped dough to rise again on the baking sheet for about 30 minutes until it puffs up.
- Score the Dough: Use a sharp knife to make slashes across the top of the loaf, which helps with even baking and gives it a traditional look.
- Bake Bread: Bake the loaf in the preheated oven for 25–30 minutes, or until the crust is golden brown and the bread sounds hollow when tapped on the bottom.
- Cool: Transfer the baked bread to a wire rack and cool completely before slicing to allow the crumb to set.
Notes
- Ensure the water used to activate yeast is not too hot, as temperatures above 115°F can kill the yeast.
- For extra flavor, you can brush the loaf with olive oil before baking or sprinkle with herbs.
- Store leftover bread in an airtight container or bag at room temperature for up to 3 days.
- Freezing the baked bread is possible: wrap tightly and freeze for up to 2 months.
- If you prefer a softer crust, cover the bread with a towel after baking while it cools.


